Thursday, June 30, 2011

Dare to Dirndl?

I did (and finally posted the pictures)!


Making a sloper is slow and arduous, so I decided to draft something easy.  Plus I need more skirts.  More solid colored skirts, really.

A few days after the end of the quarter, I ventured back into Patternmaking for Fashion Design (5th Edition) to draft up a dirndl with basic lapped waistband.  Yes, I know a dirndl is just a gathered rectangle skirt, but did you know that for a better fit, you should drop the waistline 1/4" at CB and gradually taper back to the correct side seam length?  Sounds counter intuitive, doesn't it!?  Why would you want to shorted the back piece at the CB?  There's a BOOTY back there!  Well, I learned that the reason for doing so is that your waistline actually does curve down a bit at the small of your back.  When you drape on a form, or draft patterns, you really start to notice these things.  Unless you have an extra ample booty, drop that waistline seam down 1/4" and the skirt will hang nicely and evenly all the way around the hemline!


This is how I drafted my skirt (per Mrs. Armstrong's instructions):

1)  Measure waistline (make sure it is comfortable and there is a bit of ease!) Let's say 26" (I realized that my waist is bigger now, sad!).

2) I chose a 2.5 to 1 gathering ratio so the total skirt width is 65".  At the time I was thinking about adding inseam pockets, but got too lazy.  (I wish I added them!)  I still opted for side seams though.  So I took 65" and divided it in 2.  The front panel is 32.5" and the back panels will be 16.25" each.  I wanted the zipper at center back.  Because of such a large ratio, I ended up fudging the numbers slightly and went with 32" and 16".  I also just assumed 1/2" seam allowance and did not add extra.  What's the point, right?

3) The length I chose was 20": 1/2" SA for the waistline, and a 3" hem.

4) The waistband length or circumference is your waist measurement (26") plus 1" extension, plus 1/2" SA on either side.  A total length of 28".  For the width, I chose 1.5" finished.   To do that, my width was 3" (1.5" x 2) plus 1/2" SA on the top and bottom for a total width of 4".

That's it! Those are your pieces.   Oh, and like I mentioned before, shave off that 1/4" at the CB of both back panels and gradually taper back to the 20" length at the SS.


More pictures of the dirndl:


I love the trim!  I was going to add a dainty crocheted lace trim, but my mom found this one instead.  I think its perfect!
The hem... I sewed a 3" invisible hem and then sewed the trim to the bottom. 
The waistband I topstitched the waistband down from the right side and caught the trim inside just above the gathers.

And this cute black and white vintage button finishes it off!


I really, really do recommend this book!  Well worth the price.


Finally, thanks to Amanda, Jeanettec, Fabiana, Christina, Tiffany Reagan, and Becca!  I know Tiffany Reagan and Becca both have blogs too, but I'm having trouble finding them.  Both are awesome contributors on Sew Retro!

Monday, June 27, 2011

And the winner is...


You've won the pattern!

Please email me at rofishman gmail com with your address and I will get the pattern to you ASAP!

Congrats to Faye and thanks to everyone for participating.  I'll have more pattern giveaways periodically through the quarter.  


The Boyfriend is in town now (hooray!) so I won't be sewing and probably not much blogging either.  Still need to take pictures of the dirdl.

I wanna give a shout out to Melissa of Fehr Trade for hosting a Lekala pattern giveaway! I won 2 credits and plan to download 2 patterns very soon! These are the patterns I am considering:


I know I will wear the top and skirt more than the dress, so I'm leaning toward those patterns.  What do you think?

Friday, June 24, 2011

Name that Sewing Machine?

Nine months ago my mom and I went to a church rummage sale and brought home two lovely vintage sewing machines, but we know nothing about them!  They were just too pretty to pass up.

The first is a Model DST Deluxe Streamliner straight-stitch machine, made by Matsushita in Japan:


Here's the original manual.  It does not even name the machine, the date, or anything about the manufacturer:


It even came with a universal darner:


 The second machine is a Queen? zigzag machine made by the Speedmaster Sewing Machine Corp. in Holland.  There is even less info on this machine.  I couldn't find anything like it online.  Actually, I can't find anything on either machine online.


Both machines work, just a little dirty and need some T.L.C.  I haven't used either one since I got them!  The Queen machine needs a new bobbin winder wheel because it is worn down and it doesn't make contact well with the balance wheel when you push down on the "PUSH" lever.  

If ANYONE can give me some info on these machines it would be greatly appreciated.  Any and all comments are welcome.  I really would like to know what I have.  Any resources you can point me toward?  Does anyone have one of these machines or know how much the are worth?

Thanks Readers!


On a sewing note, I finished the dirdl and have a post 1/2 written.  Just need the Boyfriend to take pictures! He'll be here tomorrow! Hooray!  Also have a Sorbetto 1/2 sewn.  Maybe I'll get it finished tomorrow and I can cut out the top of V1247.  

Wednesday, June 22, 2011

The Happy Father's Day/Birthday Shirt!

I finished my dad's Hawaiian-style shirt yesterday, just in time for his trip to Hawaii.  I'm not going this year....Staying home to babysit the dogs.

I used this pattern again:

This time around I used a strange cotton fabric.  I say strange because it is coarser than gauze, but wrinkles like it.  The yarns are loosely woven and pretty thick, visible to the naked eye.  It is printed with some unbleachable black pigment, which was really good news as I had some laundry issues with the fabric.  When I bought it ($1/yd swapmeet find, of course) we also purchased some beautiful cotton sateens.  I decided since they were all light in color, I would wash them together.  BIG MISTAKE! One of the fabric pieces was cheap-o and bled its entire printed design onto everything else.  My dad's shirt material had light blue splotches all over it.  I washed it multiple times then decided to do a bleach test on a scrap of fabric.  It worked, the fabric was washed again with bleach, and it came out all shiny and new! Very soft too!

I was really busy with the last few weeks of school so I did not have time to make the shirt before his birthday.  Oh well, I had it finished a few days after Father's Day.  Enough of my chatting...here's the shirt:


 Oops.  Looks like my dad forgot to button the bottom button.  I made the same fitting adjustments as I did with the first.  I did not do the "burrito roll" method, but opted to follow the directions.  I only got confused by one part, the first step of attaching the the yoke facing.  The pictures were a little unclear, but I managed to put it together correctly.  I just recommend reading very carefully.

My dad being a goof ball:


And showing his muscles (He didn't have time to flex...my camera battery died at the beginning of the photoshoot and we were rushed).


I am pleased with the shirt and I think my dad likes it too.  I'm happy I followed the directions because  hand-sewing the yoke facing was really relaxing.


My dirdl is almost done.  Not loving, it but it was fast and really cheap! (Like $1.25 to make). I look too hippy in it, and I don't have any hips!  I think I'm going to make myself something else before I start on my sister's Michael Starr knock-off tops again. They are boring.  I want to make V1247.  I already have the fabric for the top and skirt picked out.

Tuesday, June 21, 2011

Half Way Done Celebration Giveaway!

Hi Everyone!

Grades have been posted for this past quarter and I'm half way through school!  I'm really excited, but oh so tired.  Unlike other Professional Designation students (those who already have a college degree), I decided to spread my course work out 6 quarters, instead of 5.  I'm a little jealous of my fellow classmates who are more than 1/2 way through the program, but in doing it this way, I have been able to focus more on my studies, I haven't stressed as much, and I'm able to use the FIDM resources an extra quarter.

Anyways, back to the real reason for this post.  A Giveaway! The last giveaway I had was a success, but some readers didn't claim their patterns :(  I decided to hold on to them and give them away at a later date.  Well, today is the day!

I'm giving away this lovely pattern:


If you recall, it is a size 14, Bust 34.  The envelope is torn, (so sad) but the pattern inside is in good shape.  I just love the little bow in front!  

Here are the rules:

1) Anyone can enter, international readers as well.  (just be aware that I will choose the least expensive shipping method, so the pattern may take a while to get there.)

2) There are 2 ways to enter:
           a) Leave a comment saying you would like to be entered.  For fun, let me know what sewing or    crafting you have planned for the summer?
           b)  Link this post to your blog and share with your readers!  Then leave another comment on my blog letting me know you linked to this post.  (Two entries!)

3)  Giveaway closes on Sunday, June 26th at 8pm PST.  I will use the random # generator to pick the winner.  

That's all!  Good luck!

Vintage Vogue Pattern Score

This past weekend I scored two Designer Vintage Vogue Patterns:


This funky Valentino from 1970:


And a Chester Weinberg Vogue Americana from 1969:


They are both in great shape and complete and I want to re-sell them.  My mom and I have been accumulating a huge vintage pattern stash, but have been procrastinating getting them online to sell.  Also, we are both pack rats so its really difficult to give them up!


I kind of want to keep the Valentino pattern....sigh...


On the sewing front, I have completed another Victoria Jones Hawaiian shirt for my dad except for the buttons and button holes.  I will be finishing it today and taking pictures.  I'm also going to start drafting a dirdl skirt for myself which should be very easy, quick, and rewarding.  I really need solid color skirts. I also have to alter a dress I made for my Pattern Drafting class final.  It fits my sister pretty well and just needs to be taken in at the shoulders.  Also have to make her a couple of shirts for her birthday.

Tomorrow I am meeting up with one of my classmates to work on our personal slopers.  The first time around my measurements were not taken very accurately so I need to start from scratch.

I'll post some pics as soon as I can!

Sunday, June 19, 2011

A Case of the Uglies...

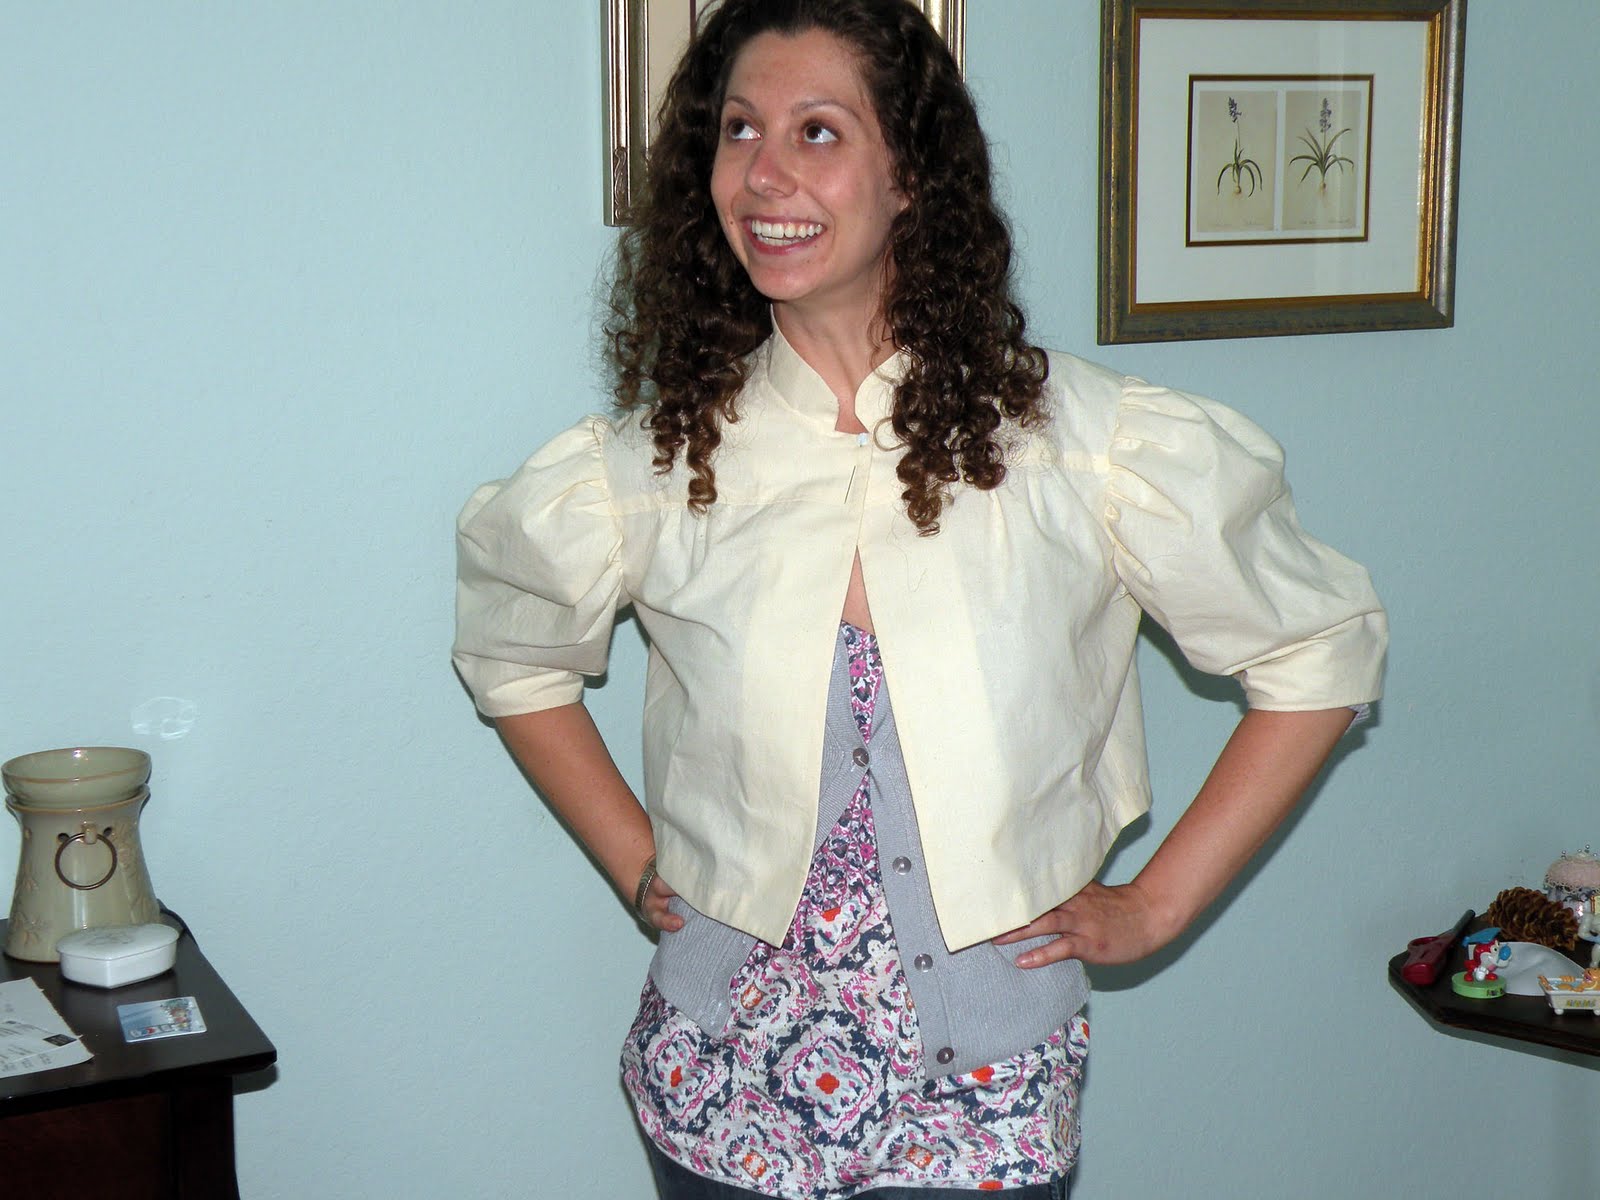
A few weeks ago for my pattern drafting class, we each had draft a simple jacket/blouse thingie with with front and back bodice gathered into a yoke and the vertical darts left un-sewn for flare.  Sort of a swing coat.  We had the option to draft a bell sleeve, puff sleeve with barrel cuff, or a leg o' mutton sleeve.  Also had the option to do a peter pan collar or a mandarin collar.  We actually drafted all the versions, but only seweed up one...thank goodness...

I decided to pick the ugliest version, just for giggles because 1) I really didn't design it and 2) It was going to be tossed at the end of the quarter.

Here it is:


sorry, creepy eyes!


Al, these are for you...


Also,

Happy Father's Day to my dad and other dads out there.