Showing posts with label top. Show all posts

Wednesday, July 1, 2015

Along Came Polly...

I haven't blogged in a year.  Sorry.  Things got nuts and blogging was not a priority nor a joy.  I got engaged last September and married in May.  Hooray!  The Boyfriend is now the Husband.  I did lots of crafting for the wedding and attempted to sew my rehearsal dinner dress, but didn't finish in time.  OH well.

Here's a blog post from last year.  I started this entry and never finished it.....

--------------------------

Did you all see that movie? Along Came Polly? I thought it sucked.  I named the blog post this because, well, I couldn't think of anything clever.

I made the Polly Top and I have to say, I really like it!  It is a great addition to my wardrobe as it goes with so many things already in my closet. (Edit:  The top is super well-made. < patting myself on the back > but I'm not loving the fabrics. I have worn it once..)


I printed out the pattern at the end of June (LAST YEAR) and decided I would attempt to build a Mini Wardrobe around the blouse for the Pattern Review Mini Wardrobe Contest. (LAST YEAR!!!) It was a fairly simple top to sew, and it would have been much easier had I not chose to make the top in a poly crepe de chine and a charmeuse.  Charmeuse is freakin' slippery and it was a nightmare to sew going around the curve.  Using it for binding wasn't a problem though.  Go figure.....

I have written a full review on PR.   I'll be posting pictures of me wearing the shirt hopefully soon.  These were late night, dark room photos.  Oh well.

Finished the Apple Peel Leggings from Pattern Magic also.  Those were a pain in the butt, but they are done and wearable.  Not a fav, but I'll go into that in it's own post.  


Saturday, March 29, 2014

My Super Cutesy Heart Top

Hi Everyone!

I made another version of Simplicity 1693!  This time I made View C.  The first time I made a floral, sleeveless View F.


Last time, I felt like I needed a very slight FBA with this pattern.  So this time, I cut the size 10 and added a 3/8" FBA (3/4" total). This helped add a little ease at the bust and balance the hem so it didn't hike up in the front.  I'm noticing hiking in some of the things I've been making.  Damn my boobs!


So I'm really stoked with the top.....with the exception of a few things.   I spent a long time lining up the hearts at CB and I missed it by 1/8."  That pissed me off.  It just shifted when I was cutting.  The other thing that is sad is the fabric itself.  I bought it at the swapmeet for $1.50yd.  It's a really nice stretch poly crepe.  Sadly, there are spots on my fabric.  The black bled out into the white leaving weird, grey blotches.  I didn't notice until I was pressing during construction.  Everyone who has seen the top said they didn't notice until I pointed them out.  I'm still going to wear it anyways and hopefully over time, the black will completely bleed into white creating a nice light grey. Hahaha.

I bound the neckline with packaged bias tape and overlocked the seams.


The bottom hem and sleeve hems are narrow hemmed.  I'm very proud of the hems actually.  They turned out very nice.


Well that's it.  See my full review at PatternReview.

 More pics below.  Oh, and the Boyfriend and I made the sewing pattern flower.  We made a bunch when we started watching Homeland a few months ago.  We never got into the show, but we have a bunch of flowers decorating our apartment.  Win!


Friday, March 21, 2014

Burda 02-2013 #127 Gathered Raglan Sleeve Top

This pattern was both a wadder and then a success.


I thought I had found the perfect pattern to use for the striped fabric below:

I really liked this grey and white stripe knit.  I purchased it in Maui years ago, and have been holding on to it.  When I finally got to working with the fabric, I realized the grain was horribly distorted, probably because it was originally a circular knit and then it was cut to roll on a bolt.  The Boyfriend and I tried pull the fabric back into shape, but we failed.  I decided to cut the pattern out anyways and put the pieces on grain as best as I could.  Construction was going fine until I realized that the fabric had no recovery! I finished the top, minus the hem, and tried it on.  It was a hot mess!  I tossed it right away along with the rest of the fabric.  I was so sad.  


I decided to try again with a black Rayon/Lycra knit I had in the stash.  This fabric was drapier, and had nice recovery.  I consider this one the success.  Not sure I love the raglan look, but it fits and looks good.  All the pictures are completely washed out to show some detail.


Changes I made:
I shortened the body drastically and shortened the sleeves by 2".  I could have shortened the sleeves more.  I also shortened the neck binding by 2" as recommended by someone on PatternReview.  For this version I sewed the sleeves on to the body first and then stitched the sleeve and side seams second.  I had to take about 1.25" out of the underarm.  I felt there was too much fabric and it was hindering my movement.
I used a twin needle on all hems.  


Link to my PatternReview.  


Sorry for all the washed out photos.  It was the only way to show the detail!

Thursday, March 13, 2014

V1247 Blue and White Smock...I mean Top

Remember the fabric featured in the pattern weight post?  Well, here's the blouse I made with it!


I used V1247, the Rachel Comey blouse.  I've been wanting to make this for a while, and finally got around to making it.

The fabric was actually from Joann's from the Lisette collection a few years ago.  I really liked it.  Unfortunately, I don't think it worked all that well with this pattern.  Again, I chose a pattern that isn't a stripe, but is.  The flowers converge on each other in a weird way in the center.  I must not have cut the fabric out as accurate as I had hoped.

Instead of following the instructions and using french seams, I just stitched the seams and then serged the edges.  It was quick and just as effective.  Not as pretty inside, but still professional looking.


I wish I would have made one size smaller and lengthened the pattern a bit.  I am short, but I would have liked it longer n the front.  Like the reviews say on PatternReview, the shirt is very low cut.  I'm usually okay with this, but since the top is large, I need to wear a cami underneath.


The Boyfriend says the top looks good on me, but he's always nice about the things I make.  It's a super comfy shirt, but I don't think I will wear it often.  :(  It reminds me of hospital scrubs.  What do you think?


Tuesday, February 25, 2014

Burda 02/2013 #135 Polka Dot Top

Hello Again.  Just trying to post my backlog of projects.  Can you tell?  It's Xmas in this photo.   Hey, do you like our first Christmas tree? The Boyfriend and I went to a tree farm and chopped it down!  We decorated it with vintage ornaments we purchased at local flea markets, ornaments from my childhood, and other ornaments my mom generously gave up because she has hundreds.  Literally hundreds of ornaments.


 Anyhoo, My boss bought me a gift card for Liberty of London fabric for Christmas in 2012 and I've been searching for a perfect pattern for the print I chose.  It needed to be simple, because the print is very busy and it's repetitive.  Instead of choosing a typical, tiny floral print, I ended up choosing a print that is a large, repeating scallop.  I essentially have to treat it as a stripe.  Ugg, why am I so attracted to stripes.  Such a pain in my ass!

I used Burda 02/2013 #135 for my first test garment because it is simple and I thought it looked cute in the magazine.

I'm not too impressed with how the top turned out.    I used a super cheap ($1/yd) cotton fabric I bought at the swapmeet years ago.  I think it's one of the first fabrics I purchased there.  Once I got the top mostly made, I realized the neckline was really bad.   I  chopped the neckline down to fit these crazy lace collars I bought at the swapmeet for probably 25 cents.  Yup, they were very cheap.  I hand stitched them on, and even though it took a long time,  I sort of enjoyed it.  Instead of stitching the binding like the Burda instructions stated, I sewed it right sides together and then flipped it entirely to the inside and topstitched 1/4" away from the neck edge.


In a different fabric, this may be cuter.  It's comfy, but it does wrinkle easily.  I don't wear it much, but it was fun to make.

My Pattern Review is here.

Sunday, June 30, 2013

Just What I Needed...Floral Tank: Simplicity 1693


I needed an quick project.  An easy one to cleanse my palate of the Boyfriend's shirt.  I went through my patterns and chose Simplicity 1693.  Then I went through my stash and found a rayon challis strike-off I got at the swapmeet.  I got 2 yards for $2.  Woohoo!  I originally thought I would make a dress using this fabric, but never paired it with the right pattern.

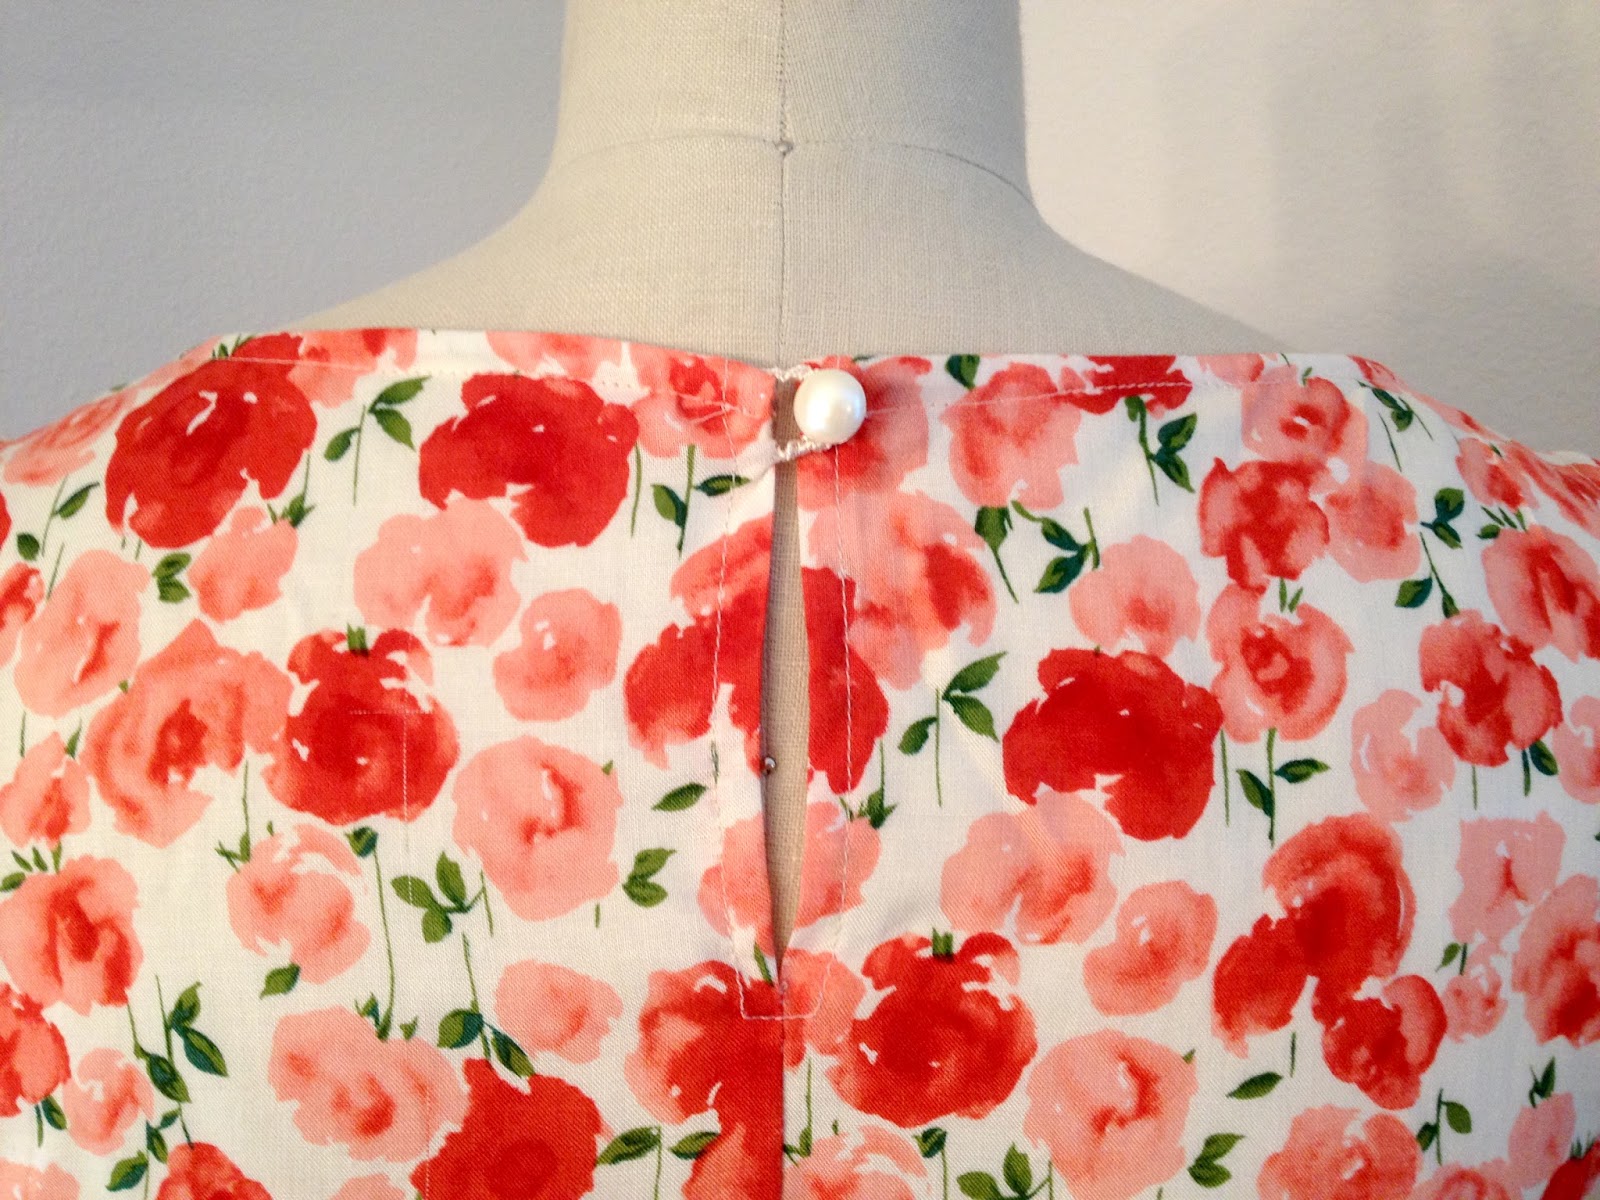
I chose view F.  I used french seams throughout and made my own self bias binding to finish the neckline and the armholes.  Without the collar, the top was sort of boring.  I decided to make spaghetti like I did for one of my first projects in school.   The spaghetti straps could have been stuffed a little more, but I think they are alright.  I hand-sewed the spaghetti straps in a swirly pattern and added pearl buttons.  Here is a close-up of the neckline:


 The instructions had you make a button loop with thread.  Mine's slightly too big for the button so it slips off the button sometimes.  And the close-up of the back:


If I make this view again, I might try the collar and I would shorten the back a little.  It is quite long on little ol' me.  I definitely want to try the other views.


Thanks to my newest followers!  190!  Woohoo!

Cat
Susan Partlan

Giveaway next time :)


Follow on Bloglovin


Monday, June 3, 2013

Birthday Shirt for the Boyfriend

The Boyfriend's birthday was at the end of April so I decided as one of his birthday gifts, I would make him a shirt.  I had the fabric picked out since last summer or fall, and was going to make the shirt for Christmas, but ran out of time.  Oh well, he now has a winter shirt just in time for summer.  :-P

I used the Colette Patterns Negroni Shirt again.  Here is the last shirt I made with this pattern.  This time I made the long sleeve version in a beautiful brushed cotton woven plaid.  Another swapmeet purchase for $1.50/yd.  Can you believe that?  If you could feel the fabric through your monitor, I think you would be impressed.

I followed the directions exactly this time, I even felled the sleeves and side seams.  The instructions for doing so are quite good.  Much better than I expected!  I only have two complaints with the pattern.  The first is that the area on the shoulder where the facing joins up with the collar is quite thick and bulky.  I trimmed and graded my SAs, but there is still some bulk.  Second, I think the sleeves are drafted long.  Or the Boyfriend has Tyrannosaurus Rex arms, but I'm fairly certain they are a normal length.  I really should have measured the sleeves beforehand, but I forgot and I also wanted to keep the shirt a surprise.  Every time I worked on the shirt, I meticulously cleaned up so he would not see what I was making.  Because the sleeves are a couple inches too long, he prefers to wear the sleeves rolled.  It looks cute that way, so I don't mind. :)


The cuffs, outer yoke, and pocket are cut on the bias.  I matched up the fronts and sides pretty well, but the sides could be better.  I'm totally pissed that I cut the back piece slightly off grain.  I hate that you can tell because it is a plaid shirt.

Overall, I'm proud of the shirt and the Boyfriend says he loves it.  He's worn it more than I wear my own self-made clothes.

Thanks to my newest Follower, Danette!


Tuesday, May 21, 2013

I Owe You a Post: New Look 6130

Hi Everyone!

I can't believe how long it has been since I've posted on here.   I moved 2 days after my last entry in January and it's been a little hectic around here since then.  The Boyfriend, Pearl, and I moved into a cute 2 bedroom apartment closer to both of our jobs.  I have a dedicated sewing room, but it took me 2 months to get my life together and set up the room!  One day, when it is cleaner, I'll take some pictures. I haven't sewn all that much, but I have some projects from last fall that I'm going to post.  I'm so tired after work and on the weekends I like to spend my time with the Boyfriend because our work schedules are out of sync and I never see him in the evenings when I get home.  He keeps encouraging me to start blogging again so here I am.

Okay, so my last sewing related post was about NL 6130.  And here's what I made:


I seriously can't remember much about the construction of this top.  The fabric is a poly. crepe that was a pain to cut and sew.  I'm fairly happy with the fit though.  I did some contouring to get a closer fit.  The invisible zip was pretty darn easy to insert and the hem took a very long time to do, but I am very pleased with my baby hem.

Not sure if I would make this again, maybe in a ponte knit and I would change the neckline and the peplum style.  I did get a few unsolicited compliments at work though.  One from my boss who is an expert patternmaker, seamstress, and fit specialist.


In spite of my lack of blogging, thanks to my new followers:

Eliane
Danielle
Sarah C
la_magnifique

Also, I had my blog anniversary about a month ago.  I've been blogging for 3 years.  That is a long time!

I'll post a giveaway soon (I promise this time!!!).


Thursday, November 1, 2012

Peplum Top Pattern Adjustment Tutorial

I promised a picture of the New Look 6130 peplum top facing pattern I redrafted and here it is:


Front facing.

Back facing.
The idea of having a neckline facing and an armsyce facing flapping around inside the shirt was gross to me, so using the main body pattern pieces I drafted my own facing and I think it worked pretty great. 

Here's how I did it:
  1. First, draw on the sew lines on your pattern pieces.  In commercial patterns, this is usually 5/8."  I, however, changed all my seam allowances before I cut the pattern so my seam allowances were 1/2" for most seams, and 1/4" along the neckline and armsyce.  I also left a 5/8" SA at CB where I was inserting the zipper.  
  2. Match up your sew lines on the front bodice pieces.  See my pattern below.  Can you see how the armhole matches up perfectly on the CF and SF bodice pieces?
  3.  Place a piece of tracing paper over the pattern and pin/tape down. 
  4. Your front facing should be  2-2.5" wide at the CF neck and 2-2.5" down from the bottom of the armhole, depending on how you will finish your edges. This is 2-2.5" from the sew line, not the cut line.  
  5. Make sure your facing is square (at a right angle to) the CF vertical line.  At the sides seam, square a line the distance down from the armhole that you decided upon. 
  6. Trace the shape  up the armhole 2-2.5" from the armhole, until you get to where an armhole notch might be.  That is where the shape starts to get a little wonky.  (the dashed lines curving around the armhole are 2.5" away from the cut line)
  7. Use a french curve and/or a hip curve to connect the two lines (one starting from CF, one from the bottom of the armscye).  The shape should look smooth and natural.  See how it didn't on the back facing and I corrected it.  
  8. At the sideseam,  mark 1/8" in at the bottom of the facing. From that 1/8" mark to zero at the underarm, draw a line.  This will be done on both front and back.  this small removal of fabric tightens up the facing a bit and prevents it from creeping out of the bodice.  
  9. On the back, I did everything above, except the facing is wider (or longer?) at CB.  I like (and was taught) to make wider facings in back.  4 inches is a good length down from the neck on this pattern.  The back neck drop is fairly shallow, so this will work well and it won't be too deep.  Basically you don't want the facing overlapping your scapula bone (your chicken wing!).  Just like you don't want a tight facing going over your boobage!  
  10.  One thing I forgot to do, but do it all the time was to decrease the shoulder width on both sides by about 1/16 - 1/8" depending on fabric thickness.  What you will do is mark both sides of the shoulder seam (on front and back facing) and blend to zero to about 2/3 the way to CF and 2/3" down the armhole, whatever blends naturally.  It's easy to see once you are doing it.  

the first step.  
That's it!


Let me know what you think!


Thanks to my newest followers!

scherimm
Becky Ensinger
Nina
Angie Newell

180! That's Amazing!

Here's a fun picture of Pearl:

Pearl modeling Fritz's Halloween costume...A Giant bath sponge!!! Yup, I made this one too in about an hour for $3.00.

HAHAHAHA!

Monday, May 14, 2012

McCall's 6241: The One Yard Wonder.


Lately I've been needing, well wanting new tops.  Easy T's and quick blouses to spruce up my jeans and a t-shirt uniform.  I love skirts and dresses, but I'm always cold, so I rarely wear them.

Here is my latest top experiment.  McCall's 6241.
I call it an experiment because though I've been wanting to make it for some time now, I recently read the reviews and they were far than glowing.  I figured, that I'd call this a wearable muslin and move on to something else quickly.  Luckily, it was very quick and I finished it in an afternoon.

Some notes on the top:

I made View A, the short sleeve version.  As you can see in the picture below, I drafted an attached facing to flip under so I would not have to narrow hem the cheap jersey. This facing worked GREAT and the neckline stays perfect all day long.  For the back neckline, I removed some of the seam allowance and drafted a binding that I just serged on, then topstitched.  It was a great solution to the narrow hem problem.


The cool thing about this top is that it only took 1 yard because I made a size 8 and the fabric was 60" wide.  The pattern calls for a 1 1/8 yds., but I squeezed it in!   I think I'm going to enter it in one yard PR challenge for the heck of it!

 More Pics:


If I ever make this again, I will shorten it by a few inches and choose a nicer knit, but I doubt I will ever work with this pattern again.

Sunday, May 6, 2012

Pixelated Camo Blouse


I finished my blouse a last week.  It's not bad, not great, but it's definitely wearable.  The fabric I used was a poly crepe de chine I got at the swapmeet and it was a pain to work with.  Extremely difficult to cut out.  It also does not lay as nice as silk would around the neckline.

I used S1806, View E.  I thought the instructions were pretty good, but the top was not difficult to put together.  Pressing was the hardest part.  the back pleat would not stay pressed and therefore shifted even with plenty of pins and basting.  My only problem with the instructions was with the sleeves.  The pictures were unclear as to where to stitch the bias binding.  My SA was not 5/8" so the armsyces are a little snug, but its not a big deal.  I also had to tack the back of the collar down to the shirt because it would not lay correctly.  I tacked the neckline facing to the shoulder seams and the 3 seams in the front.  I chose to do french seams throughout to make the shirt pretty inside.

More pictures:


That's it.  I'll be posting a review on PR soonish.  :)