Showing posts with label skirt. Show all posts

Saturday, August 11, 2012

She Sews Seashells Down by the Seashore


With the leftover fabric from this dress,  I decided to make myself a maxi skirt.  I bought a simple black maxi last winter and it is probably the most comfortable thing I have ever worn.  For a while now, I've been wanting to knock it off, and that is exactly what I did!  I used the skirt to make a pattern and now I can make a million replicas if I want.  Hooray!

The skirt is only 2 pattern pieces because the front and back are the same and the fold-over waistband is made with just two slightly trapezoidal rectangles.

This skirt was one of the fastest things I've ever made.  It seriously sewed up in about a half hr.  I started before dinner, ate yummy mediterranean food and drank too much wine and then serged on the waistband when we got home.  So easy a tipsy person could do it!

I waited a week to photograph it because I wanted to do it on location and just didn't have the time or energy to do it before now.  After work, my brain is fried.  I get up around 6am every morning and by 9:30 or 10pm I crash.  I've only been doing little sewing projects like this on the weekends.


Thanks to the Boyfriend for going to the beach with me for literally 5 minutes!  We couldn't find a parking space and parked illegally just to get these pictures.  :)

Monday, July 23, 2012

A Weekend-Only Picnic Skirt


Weekend-only, you ask?  Well, the reason is because I got a job!  I'm officially an Assistant Technical Designer and this skirt is just too short to wear to work.  I've had a full week of training on just the company info, hard and soft lines.   This week I start job-specific training.  Last week was so great and I'm so thankful the company put so much time and effort into training.  I feel so lucky to have found this job.

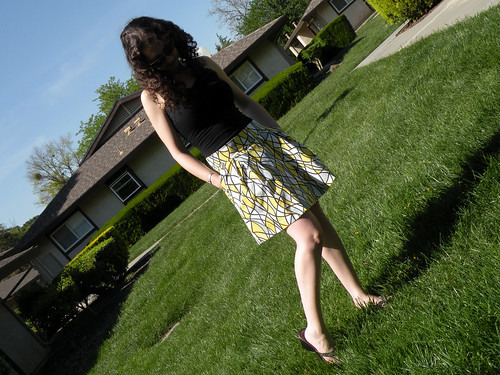
Yay!  Back to the skirt.  I saw Tilly's skirt and thought it was really cute, but never intended to make it until I went to the swapmeet and found almost the exact fabric (for $1.50/yd. I might add).  Yes, I know I could have made it with different fabric, but it really wasn't on my list of things to do.  I followed the instructions for the most part because I honestly didn't want to have to think.  Hehe.  I omitted the pockets because I wanted to draft them a little differently from the instructions, but didn't want to take the time.  I started the skirt last Sunday night, the day before my first day of work.  Being the moron that I am, I decided to not make a paper pattern, which caused me some trouble.  I accidentally cut the skirt too short, hence the skimpiness.  It is totally wearable, but I can't bend over too far.  :)


The buttons are from an estate sale find.  I do love them.


Thanks to my newest followers! I'm so sorry for the neglect of the blog.  Thanks Cynthia and Danielle

Saturday, April 14, 2012

Vintage Contest: 1969 Skirt


Hi everyone! Just finished a skirt I've been planning to make for a very long time, but never got around to it until the Pattern Review Vintage Contest sparked my interest in sewing for myself again.

Here's the pattern:

Vintage Pattern Wiki


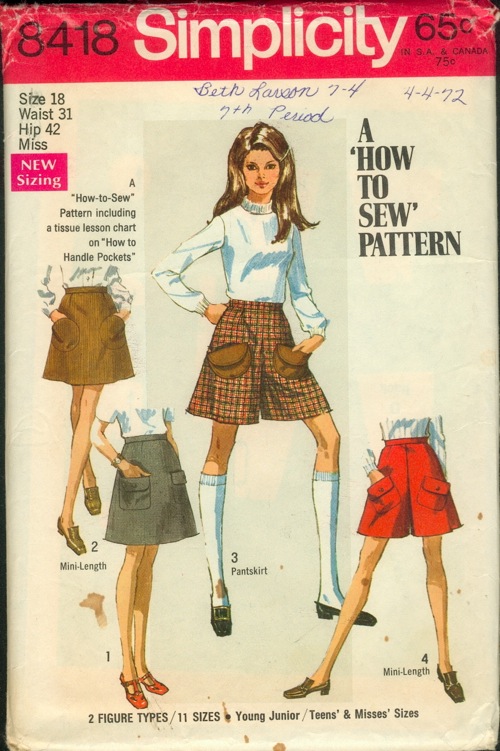
Simplicity 8418; ©1969; Young Junior/Teens' and Misses' Skirt in Two Lengths and Mini-Pantskirt: (Including a Tissue Lesson Chart ... "How To Handle Pockets"). The skirt V. 1 & 2 and the mini-pantskirt V. 3 & 4 with patch pockets have side zipper and waistband. V. 1 is regular length. V. 1 & 4 have shaped pockets with button trimmed flaps. Mini-length V. 2 has round pockets. V. 3 has top-stitched contrasting round pockets with flaps.


Here's the review:


Pattern Description:

Simplicity 8418; ©1969; Young Junior/Teens' and Misses' Skirt in Two Lengths and Mini-Pantskirt: (Including a Tissue Lesson Chart ... "How To Handle Pockets"). The skirt V. 1 & 2 and the mini-pantskirt V. 3 & 4 with patch pockets have side zipper and waistband. V. 1 is regular length. V. 1 & 4 have shaped pockets with button trimmed flaps. Mini-length V. 2 has round pockets. V. 3 has top-stitched contrasting round pockets with flaps.

I made view 2, the mini skirt.

Pattern Sizing:

Young Jr/Teen
size 13-14
Waist 26
Hips 36.5

Did it look like the photo/drawing on the pattern envelope once you were done sewing with it?

The shape yes! I did some additional topstitching.

Were the instructions easy to follow?

I glanced at them, and they were very good. Sparce, but good.   The extra information on handling pockets was very cute and had some good information!

What did you particularly like or dislike about the pattern?

I think the pattern was a little long. I made the mini skirt and it hits me just above the knee.  Not a true mini, but I'm okay with that.

Fabric Used:

Denim that was supposed to be 100% cotton from Fabric.com.  I swear they sent me the wrong fabric because there was definitely a lot of lycra in there.  I pre-washed the fabric twice and each time it got stretchier and stretchier as the sizing washed out.  Also, when I received it, there was this bad fold line down the center.  Washing it out and pressing did not work so I worked around it.  Ended up topstitching to hide it.

Pattern alterations or any design changes you made:

I added 1" total around the waist, but ended up taking it back in the same about.  I guess with the stretch of the fabric, my 27" waist did not need the extra inch.  Instead of using the half circle shape pocket facing piece, I just cut 1 circle of denim and 1 of the contrast lightweight cotton.  I sewed them RST, clipped and turned.  I really hate sewing on patch pockets that are curved.  Very difficult to get the right shape, so this was easier for me and didn't compromised the look of the design at all. I did a lot of topstitching too!  It was denim and all.  Used a button closure instead of hooks and eyes.   Oh, and a turned down the pockets a little less than in the picture on the pattern envelope.


Would you sew it again? Would you recommend it to others?

I woud not sew it again as I have too many skirt patterns I was to try and draft!  I would recommend it though.


More views of the skirt:


Hope you all like it!  Vote for me :)

Thursday, June 30, 2011

Dare to Dirndl?

I did (and finally posted the pictures)!


Making a sloper is slow and arduous, so I decided to draft something easy.  Plus I need more skirts.  More solid colored skirts, really.

A few days after the end of the quarter, I ventured back into Patternmaking for Fashion Design (5th Edition) to draft up a dirndl with basic lapped waistband.  Yes, I know a dirndl is just a gathered rectangle skirt, but did you know that for a better fit, you should drop the waistline 1/4" at CB and gradually taper back to the correct side seam length?  Sounds counter intuitive, doesn't it!?  Why would you want to shorted the back piece at the CB?  There's a BOOTY back there!  Well, I learned that the reason for doing so is that your waistline actually does curve down a bit at the small of your back.  When you drape on a form, or draft patterns, you really start to notice these things.  Unless you have an extra ample booty, drop that waistline seam down 1/4" and the skirt will hang nicely and evenly all the way around the hemline!


This is how I drafted my skirt (per Mrs. Armstrong's instructions):

1)  Measure waistline (make sure it is comfortable and there is a bit of ease!) Let's say 26" (I realized that my waist is bigger now, sad!).

2) I chose a 2.5 to 1 gathering ratio so the total skirt width is 65".  At the time I was thinking about adding inseam pockets, but got too lazy.  (I wish I added them!)  I still opted for side seams though.  So I took 65" and divided it in 2.  The front panel is 32.5" and the back panels will be 16.25" each.  I wanted the zipper at center back.  Because of such a large ratio, I ended up fudging the numbers slightly and went with 32" and 16".  I also just assumed 1/2" seam allowance and did not add extra.  What's the point, right?

3) The length I chose was 20": 1/2" SA for the waistline, and a 3" hem.

4) The waistband length or circumference is your waist measurement (26") plus 1" extension, plus 1/2" SA on either side.  A total length of 28".  For the width, I chose 1.5" finished.   To do that, my width was 3" (1.5" x 2) plus 1/2" SA on the top and bottom for a total width of 4".

That's it! Those are your pieces.   Oh, and like I mentioned before, shave off that 1/4" at the CB of both back panels and gradually taper back to the 20" length at the SS.


More pictures of the dirndl:


I love the trim!  I was going to add a dainty crocheted lace trim, but my mom found this one instead.  I think its perfect!
The hem... I sewed a 3" invisible hem and then sewed the trim to the bottom. 
The waistband I topstitched the waistband down from the right side and caught the trim inside just above the gathers.

And this cute black and white vintage button finishes it off!


I really, really do recommend this book!  Well worth the price.


Finally, thanks to Amanda, Jeanettec, Fabiana, Christina, Tiffany Reagan, and Becca!  I know Tiffany Reagan and Becca both have blogs too, but I'm having trouble finding them.  Both are awesome contributors on Sew Retro!

Tuesday, March 1, 2011

My "Bjork swan fluffy-butt" skirt

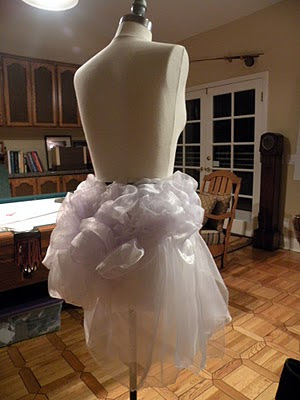
    It's done (well except for the closures).  The hems suck and a pinked all the circle flounce thingies. I really don't know what to call them.  I spent HOURS on this crazy "avante-garde" skirt.  I'd much rather be sewing for me.  The skirt does fit me, but I would never wear it in public except on Halloween and you can't sit in it! Hehe!
    I had to draw inspiration from a bunch of pictures selected by myself and 2 other classmates.  I pretty much did what I wanted and then related it back to the pictures. That's not entirely true. I had an idea going into it of what I wanted to do, and then adapted my idea to include the "curveball" picture inspirations.  I felt like I was on Project Runway.

Dramatization:

My Teacher:  "By the way, you have to draw inspiration from these pictures.  Do a couple sketches....Ready...Set...Create!"

Me:  "WHHAAAAT?"


So here it is...its better than before, but I'm not proud.


PS.  Avoid Polyester Organza at all costs.  The fabric sucks and it leaves strands and shreds of shiny fibers everywhere.  I should have worn a respirator.

Sunday, February 20, 2011

A Hot Mess...

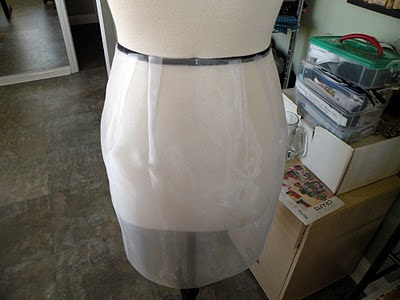
For my draping class, we have to make an "avante garde" draped organza skirt.  We started by draping a basic straight wrap skirt in muslin, and then transferred to dot paper.  I then cut and sewed the basic straight skirt in organza.

*Tip!!!
Sew crappy polyester organza over strips of tissue or tracing paper! It works like a charm and my seams were perfect.  Apparently other students (using the industrials) got their projects swallowed by the machine a few times and had to start over.


We then had to drape the organza over the base skirt.  Here is what I have so far.  It's one big hot mess!  I was going to do a bubble hem, but I haphazardly cut the overlay too short.  I think I'm going to do a hand rolled hem on everything, which will take forever.

My skirt is gross and I just hope I can get a good grade on it just for all the work I put into it.


Ugg...


Thanks to Levanah, Allie, and dikisdersi for becoming my newest followers!  You gals are great!  

Saturday, August 28, 2010

McCalls 3830 Denim Pencil Skirt

I made a denim pencil skirt ages ago.  It was one of my first projects. I remember I did flat fell seams and topstitched it in a golden yellow.  It was my first invisible zipper and it was perfect!  Here is a picture of it:


It didn't fit all that well. It was a little big so I gave it to my big sis.  


I then made another one shortly after that fit me better and I didn't do any topstitching at all.  All seams were serged.  The invisible zipper was great too.  It was a very quick project.  


Weird Face!
The back view.


Here's the PR Review:


Pattern Description: 

Skirt in five lengths have front and back darts, back zipper, faced waist and optional carriers; skirt A, B and C have back vent.

I made View D.

Pattern Sizing:

AA(6-8-10-12), DD(12-14-16-18), FF(16-18-20-22)
I made an 8, but I think I ended up with around a 6. 

Did it look like the photo/drawing on the pattern envelope once you were done sewing with it?

Yes.

Were the instructions easy to follow?

Super Easy!

What did you particularly like or dislike about the pattern?

It was easy. I
Fabric Used:

Denim. 

Pattern alterations or any design changes you made:

I have no hips So I had to straighten out the hip curve significantly and I had to narrow both front and back darts and lengthen the back darts. I also pegged in the skirt.


Would you sew it again? Would you recommend it to others?

Maybe. I think I will try another pattern first. This one wasn't my favorite pattern. 

Conclusion: 

Very easy for beginners!

Saturday, June 26, 2010

Flowy Voile Shirred Skirt

(I would never style the skirt like this.  I just needed a quick picture of me in it.  I look freakishly disproportionate).
I finally finished a UFO!  This winter, I wanted to make an elastic waist short summer skirt. I had a gift certificate to SewMamaSew and bought some of  the Anna Maria Horner voile.  I love the feel of this cotton, btw!  I decided it couldn't be too hard to draft a skirt (as in cut rectangles..).  I wanted to line it so I used a bright purple Bemberg rayon I had on hand.  (I wish I would have saved it for a jacket lining).  The elastic I originally used was 4in wide and very stiff.  My machine hated sewing on it and the project turned to be a big flop.  I was so proud of my first narrow hems too! It was devastating....really, I'm not joking.  I ripped the skirt apart twice!


I decided that shirring was the way to go.  It is easy and I achieved the results I wanted.  I salvaged the skirt! I think I'll wear it occasionally, but I think it makes my butt look big. (too bad it is too short for work).

This wasn't inspiration for my skirt, but the colorway and the style is similar.  At least I'm sort of on trend.  Haha...(And mine only cost about $16, probably the most expensive garment I have made to date.)


Free People skirt originally selling for $68, on sale at bluefly.com for $48. 


Aaaannddd....Cenetta of The Mahogany Stylist is my newest Follower! Thanks! She makes lovely garments for herself and even has her own business making clothes for people!  Check out her latest creations!

Monday, May 3, 2010

Bumble Bee skirt!


I'm officially starting to post past projects! Last weekend I "traded" the Boyfriend taking pictures of my garments for soccer outings. I think its a pretty fair trade because I enjoy spending time with him and we both need to exercise more. Plus it's a real pain in the ass to take pictures of myself outside. So here is the first project post with hopefully many more to come:


Pattern Description:
MISSES SKIRTS AND SASH: Mid-knee length, pleated skirts have faced yoke and back zipper closure; skirt A has slash front pocket with band and contrasting lower band; skirts B and C have side seam pockets; skirt B has carriers and sash; skirt C has ribbon trim at lower edge.

I made view A without the contrast lower band.

Pattern Sizing:
AA(6-8-10-12)

Did it look like the photo/drawing on the pattern envelope once you were done sewing with it?
Yes, with modifications.

Were the instructions easy to follow?
Very easy!

What did you particularly like or dislike about the pattern?
I liked everything about the pattern. I made it once before (my first skirt project) and I either cut the bottom band wrong or the pattern was drafted poorly (probably the former) because the band was waaaaay to big to even ease onto the skirt as the directions suggested.

Fabric Used:
A cotton print from Joann's apparel section, not quilting cotton. It is a bit heavier than quilting cotton.

Pattern alterations or any design changes you made:
I made a size 12 because I made an 8 the first time and it was just a smidge to small (a little snug at my waist). I should have made a size 10 because I ended up taking in about 1" side seams, which is weird because the 8 should have fit the first time (hehe). I guess I didn't have the most consistent seam allowances then. I also omitted the bottom sash. I did not line the skirt and serged all seams. I catch-stitched the hem (my first time!).

Would you sew it again? Would you recommend it to others?
I would probably sew this again a few years down the lane if I needed another skirt like this.

Conclusion:
Really easy for beginners.

More pictures!


The back.

The pockets!