Thursday, November 1, 2012

Peplum Top Pattern Adjustment Tutorial

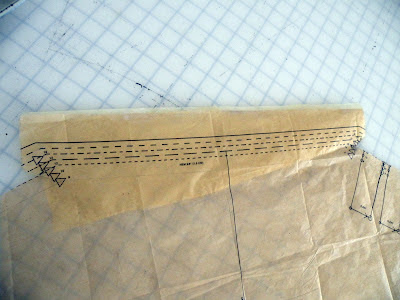
I promised a picture of the New Look 6130 peplum top facing pattern I redrafted and here it is:


Front facing.

Back facing.
The idea of having a neckline facing and an armsyce facing flapping around inside the shirt was gross to me, so using the main body pattern pieces I drafted my own facing and I think it worked pretty great. 

Here's how I did it:
  1. First, draw on the sew lines on your pattern pieces.  In commercial patterns, this is usually 5/8."  I, however, changed all my seam allowances before I cut the pattern so my seam allowances were 1/2" for most seams, and 1/4" along the neckline and armsyce.  I also left a 5/8" SA at CB where I was inserting the zipper.  
  2. Match up your sew lines on the front bodice pieces.  See my pattern below.  Can you see how the armhole matches up perfectly on the CF and SF bodice pieces?
  3.  Place a piece of tracing paper over the pattern and pin/tape down. 
  4. Your front facing should be  2-2.5" wide at the CF neck and 2-2.5" down from the bottom of the armhole, depending on how you will finish your edges. This is 2-2.5" from the sew line, not the cut line.  
  5. Make sure your facing is square (at a right angle to) the CF vertical line.  At the sides seam, square a line the distance down from the armhole that you decided upon. 
  6. Trace the shape  up the armhole 2-2.5" from the armhole, until you get to where an armhole notch might be.  That is where the shape starts to get a little wonky.  (the dashed lines curving around the armhole are 2.5" away from the cut line)
  7. Use a french curve and/or a hip curve to connect the two lines (one starting from CF, one from the bottom of the armscye).  The shape should look smooth and natural.  See how it didn't on the back facing and I corrected it.  
  8. At the sideseam,  mark 1/8" in at the bottom of the facing. From that 1/8" mark to zero at the underarm, draw a line.  This will be done on both front and back.  this small removal of fabric tightens up the facing a bit and prevents it from creeping out of the bodice.  
  9. On the back, I did everything above, except the facing is wider (or longer?) at CB.  I like (and was taught) to make wider facings in back.  4 inches is a good length down from the neck on this pattern.  The back neck drop is fairly shallow, so this will work well and it won't be too deep.  Basically you don't want the facing overlapping your scapula bone (your chicken wing!).  Just like you don't want a tight facing going over your boobage!  
  10.  One thing I forgot to do, but do it all the time was to decrease the shoulder width on both sides by about 1/16 - 1/8" depending on fabric thickness.  What you will do is mark both sides of the shoulder seam (on front and back facing) and blend to zero to about 2/3 the way to CF and 2/3" down the armhole, whatever blends naturally.  It's easy to see once you are doing it.  

the first step.  
That's it!


Let me know what you think!


Thanks to my newest followers!

scherimm
Becky Ensinger
Nina
Angie Newell

180! That's Amazing!

Here's a fun picture of Pearl:

Pearl modeling Fritz's Halloween costume...A Giant bath sponge!!! Yup, I made this one too in about an hour for $3.00.

HAHAHAHA!

Monday, October 29, 2012

It's Halloween Time! Ch-Ch-Ch...

CHIA!

When I was a kid, I loved Halloween.  As an adult, I'm not a huge fan of it.   But I do like dressing up my dogs in ridiculous costumes every year.  This year is the best by far.  I would like to introduce you to the newest knick-knack to adorn my bookshelf:

Ch-Ch-Ch-CHIA PEARL! *

It's like playing "Where's Waldo?"
Here's how I started:


A long time ago I drafted a onesie pattern from an existing dog outfit.  I made onesies before here and here. I redrafted the pattern this time, making it a little more professional.  My sewing has greatly improved since the last time I made Pearl's onesie so the construction method changed.  It went together fairly quickly and the fit is a lot better than before.

Here she is before her pjs became Chia-fied....


Pre-haircut...
 I then took apart fake hydrangeas I bought at Michaels and glued the individual buds to the base.  This process too two nights.  I used a stuffed animal roughly the size of Pearl to make it easier to glue the flowers. The glue and the flowers formed a hard shell.  I was not expecting this, but the outfit still fits the dog.

 I  couldn't resist placing her on the bedside table. She looks just like the real deal.  I wish I had video of her scurrying around on the floor as a chia pet.  It's almost eerie because at first glance it looks like  ceramic dog


And lastly, a close-up of Pearl.  I couldn't resist.  Her face is so cute in this picture.


I'm entering Pearl in the Pattern Review contest again this year.  Vote for her!


*Coming to a Walmart near you.

Wednesday, October 3, 2012

Lavender Waste of My Time

Please ignore the shoe choice.
I threw on the first pair of heels I found just to give me some height.
Also the wrinkles are atrocious.  The dress was balled up on my desk for
over a week before I took these pictures.  Excuses, excuses, excuses...
Eww. 
I'm still here, just not making as many things as I would like.  I've been working for 2.5 months as a Technical Design Assistant (woohoo!) and spending the evenings with my family and the Boyfriend.  This dress took me 2 weeks to make, just because I would work on it for a little bit, quit for a few days, work on it some more, quit, etc., etc., etc....  

I bought the fabric for I believe $2/yd. at the FIDM Scholarship store in L.A.  It is a yummy rayon/spandex blend I think.  Feels great, but wrinkles like crazy.  It was purchased with the intention of it being "muslin" fabric, specifically with this dress pattern in mind.  Oh, I forgot, the pattern is McCall's 5974, the Palmer/Plesch Faux wrap dress.  I thought I would try the pattern and if I liked it, I would use it with a gorgeous bird fabric I purchased from EmmaOneSock.  The pattern was good, but I don't think I will ever use it again.  

I'm calling this dress a wadder.  It just isn't flattering on me.   The style and the color feel very "mother of the bride."   I made the smallest size and I feel it is still too big in the bust, arms, and waist, but it shows all my lumps in back!  In this fabric (and the potential bird fabric) I would need to grade down another size or two.  The ties were also entirely too much around the waist.  Wanna here something funny?  I asked my mom to try it on and it fit her really well and flattered her figure.    


My review will be up on PR in a day or so.  In sort, I didn't follow the directions on the tie construction and used a self binding instead of hemming the neckline.

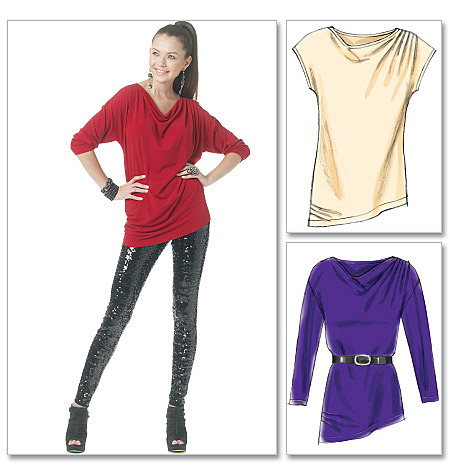
I'm currently working on New Look 6130, the peplum blouse.  I'll share pictures of how I redrafted the facings to be an all-in-one armsyce/neckline facing soonish.  On the blouse, I have to just take in the side seams a little more and hem it.  Almost done....

Thanks to the new Followers! I'll give a proper shout-out next time when I'm not falling asleep as I am typing.

Saturday, August 11, 2012

She Sews Seashells Down by the Seashore


With the leftover fabric from this dress,  I decided to make myself a maxi skirt.  I bought a simple black maxi last winter and it is probably the most comfortable thing I have ever worn.  For a while now, I've been wanting to knock it off, and that is exactly what I did!  I used the skirt to make a pattern and now I can make a million replicas if I want.  Hooray!

The skirt is only 2 pattern pieces because the front and back are the same and the fold-over waistband is made with just two slightly trapezoidal rectangles.

This skirt was one of the fastest things I've ever made.  It seriously sewed up in about a half hr.  I started before dinner, ate yummy mediterranean food and drank too much wine and then serged on the waistband when we got home.  So easy a tipsy person could do it!

I waited a week to photograph it because I wanted to do it on location and just didn't have the time or energy to do it before now.  After work, my brain is fried.  I get up around 6am every morning and by 9:30 or 10pm I crash.  I've only been doing little sewing projects like this on the weekends.


Thanks to the Boyfriend for going to the beach with me for literally 5 minutes!  We couldn't find a parking space and parked illegally just to get these pictures.  :)

Wednesday, August 8, 2012

The "Everyone and Their Mother Dress," Part II


Last Christmas I made my mom a black double knit dress using Vogue 1250 and she requested another one a while ago.  I definitely owed her a present.  Months ago we went to Michael Levine's to find a suitable knit and she fell in love with the sea shell fabric.  It has the loveliest hand and drape.   We weren't quite sure what pattern to use and settled on another V1250.  It worked out great because my mom had been wanting a summery version of the dress.

The dress sewed up very quickly with no major problems. My Brother NX250 hates sewing stretchy knits, so the tucks and the neck binding were a challenge.  I constructed almost the entire dress on the serger and used a double needle for the hems.  

I think my mom likes the dress.


There was a little more than a yard left over and I made myself something too.  Photos to come!

Wednesday, July 25, 2012

Flea Market Tote


One of the other projects I started a long time ago from the Heather Ross book was the "Everything Tote." I used Echino fabric I purchased on sale at the Purl Soho warehouse in Tustin.  It has owls and deer on it!!!!  I was so excited to make this new bag, but it was nothing but trouble!  The instructions were atrocious and if you follow them, the handles turn out to be tiny and nothing like the picture.  The amount of fabric needed is incorrect as well.  The pattern calls for 1/2yd of the self and lining fabrics, but I think you need 1.25yd each.


What I did differently:

* Pleated instead of gathered the bag front and back
* Used a completely different handle treatment.  The instructions did not make sense and there are many other ways to get the same look.
* I added buttons on either side and used a hair-tie as a quick closure.


* While cutting out the lining pieces, I accidentally cut into my fabric TWICE.  This allowed me to practice my corner seam technique.  They came out beautifully. :-P


One the plus side, this bag holds a whole lot and because I used an off-white lining, it is very easy to see and access all my "stuff."  It's a great flea market bag!

Also, it can carry an assortment of dogs.


It turned out cute, but I would not recommend this pattern.

Monday, July 23, 2012

A Weekend-Only Picnic Skirt


Weekend-only, you ask?  Well, the reason is because I got a job!  I'm officially an Assistant Technical Designer and this skirt is just too short to wear to work.  I've had a full week of training on just the company info, hard and soft lines.   This week I start job-specific training.  Last week was so great and I'm so thankful the company put so much time and effort into training.  I feel so lucky to have found this job.

Yay!  Back to the skirt.  I saw Tilly's skirt and thought it was really cute, but never intended to make it until I went to the swapmeet and found almost the exact fabric (for $1.50/yd. I might add).  Yes, I know I could have made it with different fabric, but it really wasn't on my list of things to do.  I followed the instructions for the most part because I honestly didn't want to have to think.  Hehe.  I omitted the pockets because I wanted to draft them a little differently from the instructions, but didn't want to take the time.  I started the skirt last Sunday night, the day before my first day of work.  Being the moron that I am, I decided to not make a paper pattern, which caused me some trouble.  I accidentally cut the skirt too short, hence the skimpiness.  It is totally wearable, but I can't bend over too far.  :)


The buttons are from an estate sale find.  I do love them.


Thanks to my newest followers! I'm so sorry for the neglect of the blog.  Thanks Cynthia and Danielle

Monday, June 18, 2012

Just Because...


I've been wanting to make SOMETHING from Heather Ross' "Weekend Sewing," the first sewing book I purchased.  I fell in love with the design and the projects were very cute.  I'm really glad I waited a long while to use the book because honestly the patterns are pretty poorly drafted and the instructions are awful.  So many errors!  Trying to make something from this book when I was a beginner would have been disastrous.  Luckily, I found the help I needed on the good-ole internet.

I used this awesome Echino fabric I got on sale at Purl Soho to make the Weekend Away Travel Bag.  I've been waiting for it to go on sale because it reminded of the car my best friend had in college.  It was a bright green Datsun (Al, is this right?).  For the inside I used scraps from another Echino fabric with owls and deer on it.  I'm on a deer kick right now.   Luckily I know how to restrain myself from purchasing too much random crap.

Anyways, the bag went together fairly slowly.  Unfortunately, the instructions failed to mention that one way prints don't really work for this pattern.  Also, the inner pocket dimensions are incorrect.  I omitted the pocket anyway.  The bag is nicely finished on the inside, but the final sewing step was a PITA and I had to redo it twice.  If you make this bag, measure the lengths of the two pieces you are sewing together and adjust the zipper panel piece accordingly.  

I included a lavender eye pillow, Andes Mints, and a home-made stitched card.


 I might make another bag again as a gift, but not for a while.

:)

Job Hunt Update:  I've had 2 interviews for an Assistant Technical Designer position and am scheduled for a third.  I really like the company and my potential boss.  I think this job will be challenging and am excited to both learn a lot and work hard.  I really hope I get it!  Thanks Gwen for the encouragement on my last post.

Tuesday, June 5, 2012

Job Search 2012

Hi everyone! I've been MIA for a while due to the Great Job Hunt 2012...

I'm in desperate need of a job right now and I've been sending out applications all over the place.  I would really like a position in the San Francisco Bay Area, but I think I'll take anything right now for some experience.  Sewing for myself is not a priority (although I wish it was) and instead I've been listing items on Ebay that my parents want to get rid of.  Anybody want a French Poster from the late 1800's???  :)  They are paying me, which is really nice and I've made some pocket money.  Also, I am doing some alterations for my dad.  He has A MILLION silk Hawaiian shirts he has never worn because they are all too long on him.  I've been shortening both the shirt hems and the sleeves.  

Well, that's it!  I do have a little sewing project I can show you in a couple of days.  It's a surprise present and I don't want to spill the beans before the recipient even receives the gift.

Thanks to my newest followers Ashley and Eleanor!  I'm at 170! Hooray!

Monday, May 14, 2012

McCall's 6241: The One Yard Wonder.


Lately I've been needing, well wanting new tops.  Easy T's and quick blouses to spruce up my jeans and a t-shirt uniform.  I love skirts and dresses, but I'm always cold, so I rarely wear them.

Here is my latest top experiment.  McCall's 6241.
I call it an experiment because though I've been wanting to make it for some time now, I recently read the reviews and they were far than glowing.  I figured, that I'd call this a wearable muslin and move on to something else quickly.  Luckily, it was very quick and I finished it in an afternoon.

Some notes on the top:

I made View A, the short sleeve version.  As you can see in the picture below, I drafted an attached facing to flip under so I would not have to narrow hem the cheap jersey. This facing worked GREAT and the neckline stays perfect all day long.  For the back neckline, I removed some of the seam allowance and drafted a binding that I just serged on, then topstitched.  It was a great solution to the narrow hem problem.


The cool thing about this top is that it only took 1 yard because I made a size 8 and the fabric was 60" wide.  The pattern calls for a 1 1/8 yds., but I squeezed it in!   I think I'm going to enter it in one yard PR challenge for the heck of it!

 More Pics:


If I ever make this again, I will shorten it by a few inches and choose a nicer knit, but I doubt I will ever work with this pattern again.

Sunday, May 6, 2012

Pixelated Camo Blouse


I finished my blouse a last week.  It's not bad, not great, but it's definitely wearable.  The fabric I used was a poly crepe de chine I got at the swapmeet and it was a pain to work with.  Extremely difficult to cut out.  It also does not lay as nice as silk would around the neckline.

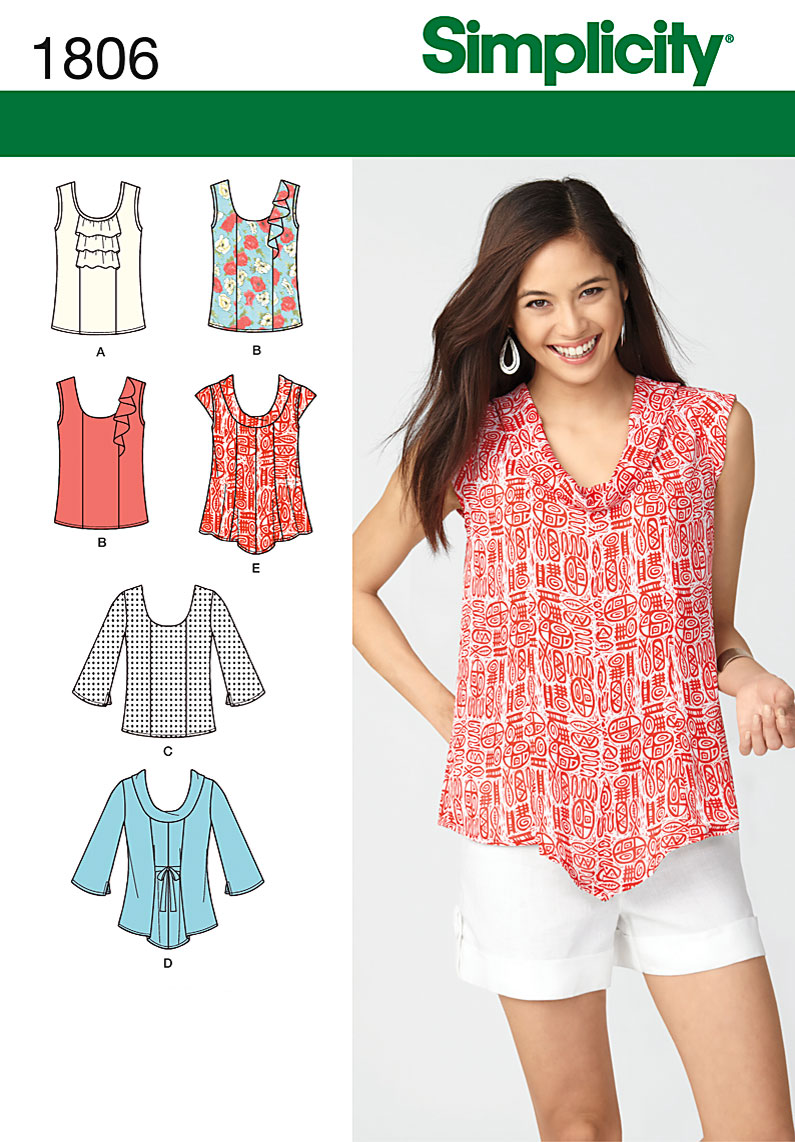
I used S1806, View E.  I thought the instructions were pretty good, but the top was not difficult to put together.  Pressing was the hardest part.  the back pleat would not stay pressed and therefore shifted even with plenty of pins and basting.  My only problem with the instructions was with the sleeves.  The pictures were unclear as to where to stitch the bias binding.  My SA was not 5/8" so the armsyces are a little snug, but its not a big deal.  I also had to tack the back of the collar down to the shirt because it would not lay correctly.  I tacked the neckline facing to the shoulder seams and the 3 seams in the front.  I chose to do french seams throughout to make the shirt pretty inside.

More pictures:


That's it.  I'll be posting a review on PR soonish.  :)

Friday, May 4, 2012

Review: Sewing Kit iPhone App

App Store


When I got my iPhone in December, I downloaded an App to help catalog and organize my sewing patterns.  It is called Sewing Kit by Vesta Software.  I haven't heard of any other sewing bloggers using it so I thought I would do a review.  Lately, I've been spending ALOT of time taking photos of my patterns and putting them on my phone.  Already over 125 patterns!  Below is the description from the iTunes App store and  I'll tell you a bit more about my experience with the program.  


Description (taken directly from the App Store site)

Sewing Kit is your new home for all of your sewing needs!

If you have ever been in a sewing store looking at patterns, but couldn’t remember if you already bought the one you like, or if the fabric you like will work with the project you are working on, then you will love Sewing Kit!

Now scan the pattern envelope while in the store to look it up, and add it if you don't have it!

Sewing Kit lets you search through all of your patterns, fabrics, projects, and people to make sure you are not buying something twice, or getting home and finding out you forgot to get something you really needed!

With Sewing Kit you can store and search on all of your:
- patterns
- fabrics
- projects
- measurements for people

All of these things, all in one place.

Features:

For Patterns, each entry has: company name, pattern number, size, brand, your own rating of it, where you are storing it, “unlimited” photos, “unlimited” notions, “unlimited” types of fabrics, and much more!!!

Also - for each pattern from Butterick, Kwik Sew, McCall’s, Neue Mode, Simplicity or Vogue, Sewing Kit will _try_ to download the envelope images (including the back panel) if they are available on the company’s public web site (Butterick usually requires a "B" as the first digit in the pattern number for this to work, "M" for McCalls, and "V" for Vogue). Not all images are available. Not all sites have the back panel image available. All images remain copyright of their respective web sites.

For Fabrics, each entry has: name, color, material, amount, been ironed?, been washed?, where you bought it, where it’s stored, “unlimited” photos, and more!

For Projects, each entry has: name, who its for, notes, “unlimited” photos, pattern being used, status, type, and more!

For People, each entry has: person’s name, “unlimited” photos, and “unlimited” measurements!

Sewing Kit is also highly customizable! You can manage your own list of Pattern Companies, Fabric Types, Notion Types, Ratings, Measurements, and more!

Sewing Kit has been localized into English, Spanish, and French! Let us know if there are other languages you would like to see Sewing Kit in.

SewingKitLT (our Lite version) is also available (for free!) to try out all of the features, before buying the full version.

Questions? Comments? Concerns? Ideas for more features?
Come by our site at http://www.vestasoftware.net or drop us a note at ideas@vestasoftware.net, or if you find bugs, bugs@vestasoftware.net

Please let us know what more we could be adding to make Sewing Kit even better!


These “unlimited” items are limited by the amount of free storage space on your device, not by Sewing Kit.
 Examples from the site (these photos are very accurate.  looks the same on my phone):
App Store

App Store

App Store


I like the app a lot, but it has a few bugs. Firstly, it crashes from time to time in the middle of uploading a pattern.  It used to do this more often, but now it is less frequent.  Also, it rarely has older OOP patterns or very new patterns in their database.  It almost never has the back of the envelope with the size and yardage information.  Usually only the tech drawings are included.  This means I have to take photos of every pattern front and back first.  I use a different app from the Camera App included on the phone, transfer the files to the Camera Roll, then insert them in the Sewing Kit App.  By taking the photos in the Sewing Kit App, the pictures tend to come out blurry.  The process is time consuming, but it works for me.  Oh, one more negative thing.  The customer service is pretty bad.  I emailed months ago about the freezing that occurs.  It was driving my crazy.  (It is much better now).  I got no response and there wasn't an update for months.  It worried me, but the program is working better now.

What I love about the App is that it is truly customizable.  I have added tons of vintage patterns to the App and have added the Pattern Company names (Hollywood, Advance, Marian Martin, etc) to the Pattern Company List.  Under Categories, I have included tons more (children, men's, accessories, etc) so when I search for something, I can find it by category.

I also like how I can put people measurements in the phone.  I have only done it for my mom, which has been very useful because she can never remember her measurements.  When we go pattern shopping, this comes in handy.

It has been very helpful when I shop for fabric too. I don't have to bring patterns with me.  This is great for the delicate vintage patterns and saves room in my purse.

Right now the price is $4.99.  I think I paid almost $10, and that is really disappointing.  It is worth the 5 bucks, if you are willing to spend HOURS cataloging your patterns.  I don't know if I will do the same with my fabric.


Even with the bugs, I think I would recommend it.

Does anyone else use this App or another one like it?  How is it?  Do you like it?


Wednesday, May 2, 2012

A Little Sewing at Disneyland...

I've been loving the vintage sewing displays on Main Street in Disneyland.  Thought I'd share them with all of you:
So cute, I think this is the newest display.  

A close-up of the back wall of another.

And my favorite:  Shot glasses and a vintage sewing machine.  Hard liquor...just what you need after a long day sewing....
Thanks to my latest followers frau tipmatic and chesneykat.  Check out chesneykat's blog at Room for Sewing.

Monday, April 30, 2012

Teal Garden Dress: Cynthia Rowley S2443

I bought a really nice teal double knit at the swapmeet not too long ago and had plans to make my mom a another version of V1250 because it had some additional stretch in the lengthwise direction.  She liked the fabric, but wanted the dress is a print instead.  I decided to try the Simplicity Cynthia Rowley pattern S2443 again.  Last time, I made this jacket.  At the time, I attempted the dress, but I used the wrong fabric and had a horrible time with the zipper.  Also, the amount of gathering at the waist was too much so I gave up.

This time, I took about 10 in. total from the gathers (to prevent the oh so flattering pregnancy look) and omitted the zipper.  I also only interfaced the waistband and shortened the dress 4 inches.

I wrote a lot more on PR.


I'm really proud of this dress because it was supposed to be a quick and easy project, but turned out to be more challenging than it should have been.  I had to rip out the sides 3 times on each side just to line up the side seams of the waistband and skirt.  Such a pain in the butt.  I overlocked almost the entire dress, including the attachment of the very curvy straps without basting.  I've already worn it twice!

Thanks for the comments and suggestions on my pants both on the blog and PR.  

I'm currently working on this:

View E (pictured)

It's almost done, but I've had a lot of distractions lately and had a bit of trouble getting the back pleat to lay properly.  This may end up being a wadder.