Showing posts with label tutorial. Show all posts

Thursday, November 1, 2012

Peplum Top Pattern Adjustment Tutorial

I promised a picture of the New Look 6130 peplum top facing pattern I redrafted and here it is:


Front facing.

Back facing.
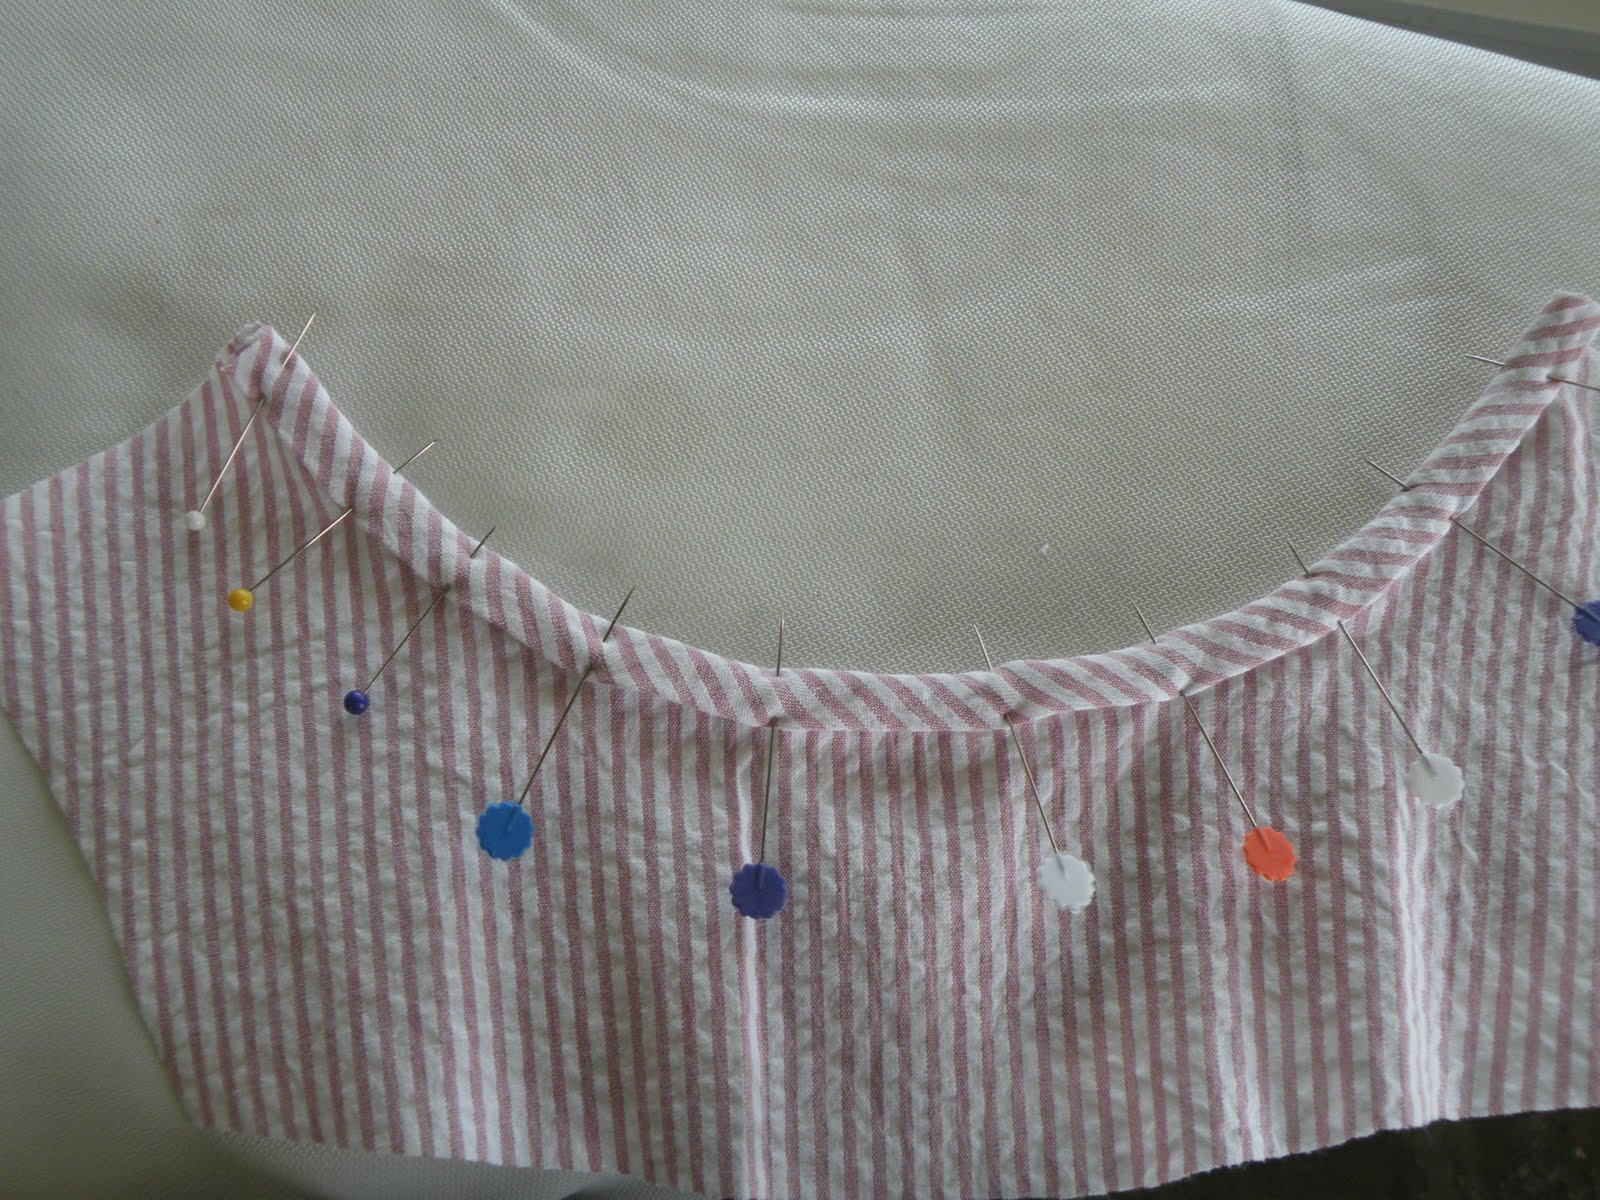
The idea of having a neckline facing and an armsyce facing flapping around inside the shirt was gross to me, so using the main body pattern pieces I drafted my own facing and I think it worked pretty great. 

Here's how I did it:
  1. First, draw on the sew lines on your pattern pieces.  In commercial patterns, this is usually 5/8."  I, however, changed all my seam allowances before I cut the pattern so my seam allowances were 1/2" for most seams, and 1/4" along the neckline and armsyce.  I also left a 5/8" SA at CB where I was inserting the zipper.  
  2. Match up your sew lines on the front bodice pieces.  See my pattern below.  Can you see how the armhole matches up perfectly on the CF and SF bodice pieces?
  3.  Place a piece of tracing paper over the pattern and pin/tape down. 
  4. Your front facing should be  2-2.5" wide at the CF neck and 2-2.5" down from the bottom of the armhole, depending on how you will finish your edges. This is 2-2.5" from the sew line, not the cut line.  
  5. Make sure your facing is square (at a right angle to) the CF vertical line.  At the sides seam, square a line the distance down from the armhole that you decided upon. 
  6. Trace the shape  up the armhole 2-2.5" from the armhole, until you get to where an armhole notch might be.  That is where the shape starts to get a little wonky.  (the dashed lines curving around the armhole are 2.5" away from the cut line)
  7. Use a french curve and/or a hip curve to connect the two lines (one starting from CF, one from the bottom of the armscye).  The shape should look smooth and natural.  See how it didn't on the back facing and I corrected it.  
  8. At the sideseam,  mark 1/8" in at the bottom of the facing. From that 1/8" mark to zero at the underarm, draw a line.  This will be done on both front and back.  this small removal of fabric tightens up the facing a bit and prevents it from creeping out of the bodice.  
  9. On the back, I did everything above, except the facing is wider (or longer?) at CB.  I like (and was taught) to make wider facings in back.  4 inches is a good length down from the neck on this pattern.  The back neck drop is fairly shallow, so this will work well and it won't be too deep.  Basically you don't want the facing overlapping your scapula bone (your chicken wing!).  Just like you don't want a tight facing going over your boobage!  
  10.  One thing I forgot to do, but do it all the time was to decrease the shoulder width on both sides by about 1/16 - 1/8" depending on fabric thickness.  What you will do is mark both sides of the shoulder seam (on front and back facing) and blend to zero to about 2/3 the way to CF and 2/3" down the armhole, whatever blends naturally.  It's easy to see once you are doing it.  

the first step.  
That's it!


Let me know what you think!


Thanks to my newest followers!

scherimm
Becky Ensinger
Nina
Angie Newell

180! That's Amazing!

Here's a fun picture of Pearl:

Pearl modeling Fritz's Halloween costume...A Giant bath sponge!!! Yup, I made this one too in about an hour for $3.00.

HAHAHAHA!

Tuesday, September 27, 2011

Quick Sewing Machine Cleaning Tip


I learned this little tip during my serger class a couple years ago and thought I would share since I was cleaning the dust bunnies from my sewing machine.

The best thing to clean out the uglies is an old, fluffy make-up brush.


For some reason, make-up brushes attract the lint better than anything else I've tried.


So go buy yourself a new powder brush and clean out your machine with the old!
 

Tuesday, August 9, 2011

Awesome! but no pretty pictures.... :(

All of a sudden, I got a huge jump in followers and I couldn't figure out why?  Were people commiserating with me on my failed drape?  Do you really like the pooey references to my work?  I didn't think so.

Well, Burdastyle featured my French Bias Binding tutorial on their weekly email newsletter!  Hooray!

I hope all the new followers enjoy the blog and I hope I have time(!) to post some new sewing tutorials!

I really want to do one on:

Dart manipulation

A cool and different way to do a FBA

Contouring

Hopefully one day....

I'm currently procrastinating a HUGE Creative Design Applications project.  I'll be up until 3 am I'm guessing.

Next time....A follower shout-out and thank you!

 You can still enter to win this pattern.  Everyone is welcome to name that dress!

Tuesday, July 5, 2011

French Bias Binding Tutorial!

A sample I had to make for my FIDM sewing binder that I thought I would share...

French Bias Binding!

There are lots of great tutorials out there for working with bias binding.  One of my favorite ways of using bias binding on a neckline or an armhole is doing the french bias binding method.    In this method, the bias strip (usually 2" wide) is folded in half when attached and therefore double thickness of fabric.

There are two ways to attach the binding:

1) Topstitch from the front

2) Stitch in the Ditch from the front

I'm going to show you how to do the topstitching method and then explain the stitch in the ditch method!


1.  Above you see my neckline sample and a 2" wide bias strip.


2.  Fold bias tape in half, wrong sides together.  Match the raw edges of the folded bias tape to the raw edge of the wrong side of neckline.  Sew a 1/4" seam around the neckline.  


3.  Press the bias binding and the seam allowances up.  


4.  Fold the binding over to the right side just covering up the line of stitching.


5.  Pin in place (If you are real good, it's unnecessary).


6.  Edge stitch the binding from the right side and you are done!

 You can also hand stitch the binding down using a slip stitch (a blind stitch in which you stitch about 1/4" in the fold or tunnel of the binding, then take a small 1-2 thread "bite" of the main fabric, then continue back into the fold).


Okay so the other way you can do this is:

1)  Fold bias tape in half, wrong sides together.  Match the raw edges of the folded bias tape to the raw edge of the RIGHT side of neckline.  Sew a 1/4" seam around the neckline.

2) Press the bias binding and the seam allowances up.

3) Fold the binding over to the WRONG side just covering up the line of stitching.

4)   Pin in place.

5) Stitch in the ditch from the RIGHT side catching the folded over bias tape on the back.  


Hope this was helpful!  This is also a great way to bind quilts.  Very sturdy, and crisp.  


Also, thanks Nonissima for becoming the newest follower! 


Thursday, June 30, 2011

Dare to Dirndl?

I did (and finally posted the pictures)!


Making a sloper is slow and arduous, so I decided to draft something easy.  Plus I need more skirts.  More solid colored skirts, really.

A few days after the end of the quarter, I ventured back into Patternmaking for Fashion Design (5th Edition) to draft up a dirndl with basic lapped waistband.  Yes, I know a dirndl is just a gathered rectangle skirt, but did you know that for a better fit, you should drop the waistline 1/4" at CB and gradually taper back to the correct side seam length?  Sounds counter intuitive, doesn't it!?  Why would you want to shorted the back piece at the CB?  There's a BOOTY back there!  Well, I learned that the reason for doing so is that your waistline actually does curve down a bit at the small of your back.  When you drape on a form, or draft patterns, you really start to notice these things.  Unless you have an extra ample booty, drop that waistline seam down 1/4" and the skirt will hang nicely and evenly all the way around the hemline!


This is how I drafted my skirt (per Mrs. Armstrong's instructions):

1)  Measure waistline (make sure it is comfortable and there is a bit of ease!) Let's say 26" (I realized that my waist is bigger now, sad!).

2) I chose a 2.5 to 1 gathering ratio so the total skirt width is 65".  At the time I was thinking about adding inseam pockets, but got too lazy.  (I wish I added them!)  I still opted for side seams though.  So I took 65" and divided it in 2.  The front panel is 32.5" and the back panels will be 16.25" each.  I wanted the zipper at center back.  Because of such a large ratio, I ended up fudging the numbers slightly and went with 32" and 16".  I also just assumed 1/2" seam allowance and did not add extra.  What's the point, right?

3) The length I chose was 20": 1/2" SA for the waistline, and a 3" hem.

4) The waistband length or circumference is your waist measurement (26") plus 1" extension, plus 1/2" SA on either side.  A total length of 28".  For the width, I chose 1.5" finished.   To do that, my width was 3" (1.5" x 2) plus 1/2" SA on the top and bottom for a total width of 4".

That's it! Those are your pieces.   Oh, and like I mentioned before, shave off that 1/4" at the CB of both back panels and gradually taper back to the 20" length at the SS.


More pictures of the dirndl:


I love the trim!  I was going to add a dainty crocheted lace trim, but my mom found this one instead.  I think its perfect!
The hem... I sewed a 3" invisible hem and then sewed the trim to the bottom. 
The waistband I topstitched the waistband down from the right side and caught the trim inside just above the gathers.

And this cute black and white vintage button finishes it off!


I really, really do recommend this book!  Well worth the price.


Finally, thanks to Amanda, Jeanettec, Fabiana, Christina, Tiffany Reagan, and Becca!  I know Tiffany Reagan and Becca both have blogs too, but I'm having trouble finding them.  Both are awesome contributors on Sew Retro!

Saturday, June 18, 2011

Tip for Beginners: Mini Tutorial!

This is one of those tips that I thought I would share because when I started sewing, this never occurred to me, but it seems like second nature now.

When hemming, especially in the round in a small space,  after pressing up the hem, flip the garment right sides out and sew in the circle of fabric.  This really helps you see what you are sewing better, and prevents you from accidentally sewing through the other layer of fabric.

Do this:


Not this:


Because this will happen:

Hope this helps some newbies out there!

Wednesday, March 30, 2011

Spaghetti Strap Tutorial!


Last quarter I learned how to make spaghetti straps.  Spaghetti can be used as straps for a dress or blouse (duh!) or as a tie for a casing and I'm sure for hundreds of other applications.  Making sturdy and thick (as in fully stuffed!) 1/4" spaghetti isn't all that hard, but it can be a little tricky to start.  It's difficult to fit 1 1/2" of fabric into a 1/4" tube!  Making the spaghetti for my bias slip dress was a pain in the butt and required a whole lot of muscle because the tube was seemingly never ending!  I used a standard loop turner you can buy pretty much anywhere (Joann's, Hancock, Amazon, etc).  It isn't my favorite tool to use for turning all tubes, just spaghetti.  
So in my sewing class, my teacher taught us a trick that not all instructors apparently teach, which I found really useful.  The trick is essentially making a funnel at the top of the bias tube so the I ended up teaching it to a couple of students in my draping class because we had to make spaghetti again for our sewing sample binder.

So here it goes:

1)  Make 2" wide bias tape.  There are many tutorials out there.  Just make sure your bias tape is 2" wide because you need the extra fabric to "stuff" into the 1/4" tube.  Fold and press the bias tape in half.


2)  With the cut edges on your left, place the tape on your machine bed with the needle on cut edge about 1/2" down from the top edge.    

3)  Start stitching (don't forget to backstitch a few stitches) with a regular stitch length diagonally to the folded edge.  Stop when you get 1/4" away from the folded edge.  You want to make sure the diagonal stitch is gradual and pretty long.  You want a substantial funnel shape.  This funnel is what allows for an easier turn.  Less fabric has to be forced into the tube at first making it easier.  


4)  Continue to stitch at a 1/4" from the folded edge the rest of the length of the bias tape.


5)  Cut off the top of the funnel to the first stitch.


6)  So for the next part I don't have pictures.  Insert your loop turner into the skinny end of the tube (not the funnel side).  Hook the latch end of the loop turner to the top of the funnel.  I actually poke a hole in the fabric with the moveable latch because you will be cutting off the funnel part once it is is completely turned. The funnel makes it easier to turn. 

7) When you are pulling the fabric, hook the circle end of the loop turner to your sewing machine or some other place and it will be your third hand! A big help!   

8) You end up with stuffed spaghetti! You can really do this thinner, but your original bias strip will have to be less wide as well.  


If you want to buy a loop turner, here's one on Amazon!

And thanks to my new Followers!  Woohoo!  I'm totally giving away some fun vintage patterns once I hit 75 followers!  It's getting trickier and trickier to figure out who is following me on blogger I think my new followers are: 

Andrea, Marta, and Faye of Fayes Sewing Adventure!  Love her blog! She makes some really nice garments! My favorite was her Colette Patterns coat!  She also just had her blogoversary so go to her site and give her some love.  

If I missed anyone, tell me! I'd be happy to give you and your blog a shout-out!

Saturday, January 8, 2011

My Cornered Seam Tutorial is Featured on Facebook

How cool is that??? My Cornered Seam tutorial  is featured on the BurdaStyle Facebook page!

I'm so excited!

So is Pearl!
Pearl in my friend Laurie's handmade, beautiful Ewok hoodie!

Friday, December 31, 2010

Easy, Pretty Cornered Seams Tutorial

I learned this technique at FIDM in my Industry Sewing course and thought I would share it with you.  It rather straightforward and has worked every time for me.  It was one of those life-changing sewing moments!

Here's the Tutorial:

1.  Mark the pieces with any method you like at the corner.  Depending on the fabric, I use disappearing ink or tailor-tacks.  Here, I marked with disappearing ink.  For the tutorial only, I marked the stitching line and the Right and Wrong sides (RS/WS).  I used a 1/2" SA, but any SA will work.

2.  Place pieces RS together, matching up notches, stitching line and corner "dot."


3.  Stitch to the corner "dot."  This needs to be EXACT!


4.  With the needle down, lift the presser foot and rotate both pieces so the corner is facing you.


5.  Clip into the corner all the way to the needle.  It is OKAY to let the scissors touch the needle.  This step is really important.


6.  Rotate the pieces back to their original position so the piece on top (the inset piece) is back on the stitching line.

7.  Now here is the only tricky part.  With the presser foot still up and the needle in the fabric on the "dot,"  rotate the top inset piece toward you rotating it counter-clockwise.  At the same time, rotate the bottom piece clockwise, so the raw edges will meet.  The next two pictures illustrate this and the drawn on arrows show which way to rotate the pieces.   Because we clipped the corner, we can do this easily!


8.  As you can see, the pieces are still RS together and the raw edges are lined up on the correct line on the throat plate.  You can't see it, but all the excess fabric is pushed aside under the inset (top) piece so that when stitching the 1/2" seam, nothing is caught in the stitching line.  Then stitch to the end.


 Here is the WS, right after it is stitched.  By clipping and rotating the the pieces, it spreads that clip.


There is no need to clip the inset piece.  The pieces automatically lie toward the larger piece.  Press in that direction unless there is a reason to press the toward the inset piece.  If you need to press that way, you will need to take a wedge out of the corner.


Here it is pressed from the front and the back.


Try It...You'll Like It!

Let me know what you think :)

Friday, December 24, 2010

Burrito Time.

The Burrito Method for clean-finishing a shirt with a back yoke.

Here it goes:

1)  With right sides together, sew yoke to back.  I like to just baste this seam.  After you baste,  sew the right side of the yoke facing (will be referred to as facing) to the wrong side of the back with regular stitch length.  Now, both the yoke and the facing are attached.  

In the picture below, you are looking at the facing and the wrong side of the back of the shirt.  The yoke and the facing are wrong sides together.


This picture illustrates better how the pieces are attached.


2)  Now attach the front pieces to the yoke, right sides together.  Make sure the front facings or the plackets are finished before you do this step.

In the pictures, the shoulder seams are sewn.  Actually, it is better to pin them in place (or baste if you like).

3) Now its time to fill the burrito.  Open the yoke and facing so the wrong sides are on the table.  Hopefully you can see that both the front pieces and the back piece were rolled up together all the way to where the back is attached to the yokes.  Sorry about the busy fabric, but can you see that the facing is at the bottom of the picture and the yoke with the front attached by pins is that top?


4)  Bring the facing up to yoke at the shoulder seams, enclosing the front and back shirt pieces in the burrito.  The yoke and its facing are right sides together.  Re-pin the shoulder seams so that you are pinning the yoke to the fronts to the facing, in that order from back to front.  Stitch the shoulder seams (5/8in. if home-sewing, 1/2in. if industry sewing).  Make sure you are not accidentally sewing any part of the burrito roll into the shoulder seam.

5)  Gently pull the shirt through the neck hole and, "Voila!" You have a beautifully made shirt!  You should not see SAs at the shoulder seams or the yoke seam.  Hurray!


Hope you find this helpful!  
I wrote this very late last night so if you need clarification, let me know :)

Happy Holidays!