Sunday, April 22, 2012

Lucy in the Sky with Diamonds


My boyfriend's friends just had a baby girl (Lucy), and with my new found free time, I decided to make an outfit for her.  It's Effing CUTE if I do say so myself!  My boyfriend says the F word and cute just don't go together, but I have to disagree.  I can't stop cussing when I look at the little outfit.  :-P

I used McCall's 6303, a pattern I picked up this past Sunday at Joann's for 99 cents.  I bought the blue pincord fabric a while ago because I was shopping on Fabric.com and needed to reach $35.00 for free shipping.  I know....excuses, excuses.   I'm not a big fan of super girly kids clothes.  So I bought blue, because it could work for either sex.  The diamond print was in my mom's stash and she let me use about a yard of it for the outfit.  I made view C, but added pockets for extra cuteness.  The rickrack was awful though to attach.  New rickrack is made of such nasty fibers that it frays as soon as you cut it.  I always try to use vintage, but I didn't have any white in the right size.  I made covered buttons with a vintage metal button maker kit and it works every time.  I'll never buy new cover buttons kits if I can avoid it.   I highly recommend the vintage sets.  


Now on to the Review:

Pattern Description:

INFANTS' DRESSES, PANTIES AND HAT: Sleeveless A-line dresses A, B, C, D, E, F, G have trimming variations; dresses A, B, C, D, E have self or contrast fabric lining and a button closure at each shoulder; dresses A, B, C have criss-cross back; dresses D, E have open sides with contrast ties; dresses F, G have binding at neckline and armholes forming ties at shoulders; dresses B, D, F have front patch pockets; panties and hat are also included.

Pattern Sizing:

S-XL, I traced off a M for a 3-6 month old.  Hopefully it fits!
The hat is one size and it is large!

Did it look like the photo/drawing on the pattern envelope once you were done sewing with it?

Yes!

Were the instructions easy to follow?

Very easy, except for the hat.  Not the best instructions there. McCalls omitted the fact that you need 6 crown pieces for the hat lining.  Oops!  I new it couldn't be right when I read the pattern instructions, but I figured it out.  The instructions for inserting the elastic are ridiculous.  I'll have to come up with a better way next time.  Make sure you leave a big enough hole in the dress lining and the hat lining so you can fit your hand in the aid in pressing the dress and hat, and inserting the elastic in the hat.  If you don't you'll be sorry!

Also try to find vintage rickrack, it does not fray nearly as bad as the new, crappy stuff.  

What did you particularly like or dislike about the pattern?

It's Super cute.  Like I could die it's so cute!

Fabric Used:

Cotton/poly pincord from Fabric.com and quilting cotton from local discount fabric store. 

Pattern alterations or any design changes you made:

I added the pockets from another view.  I also used self-covered buttons and made the dress reversible with careful sewing on of the rickrack and adding buttons on the lining side. Oh, and I took off about an 1" from the top of the panties because other reviewers said they were too big.  

Would you sew it again? Would you recommend it to others?

Definitely if I have a baby or I need to make another gift.

Conclusion:

EFFING CUTE!


More Pictures:

The back

Self-covered button and rickrack detail.

Pocket!

Adorable hat, the bunching is from the elastic.  I love the bow!


It's reversible!


Saturday, April 21, 2012

Dad's Long Sleeve Button Down Shirt


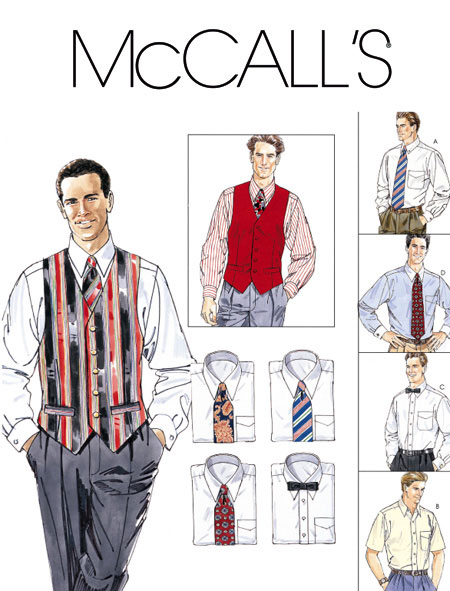
My dad requested a long sleeve, french cuff, button-down shirt for xmas 2011.  I bought McCall 2447 for the project because it had a back yoke and french cuffs already drafted in the pattern.  The only thing I was going to have to change was the front band.  My dad wanted a contrast band so I had to split it off the right side of the shirt and slightly redraft.  

Perfect pattern to work with for this project.  


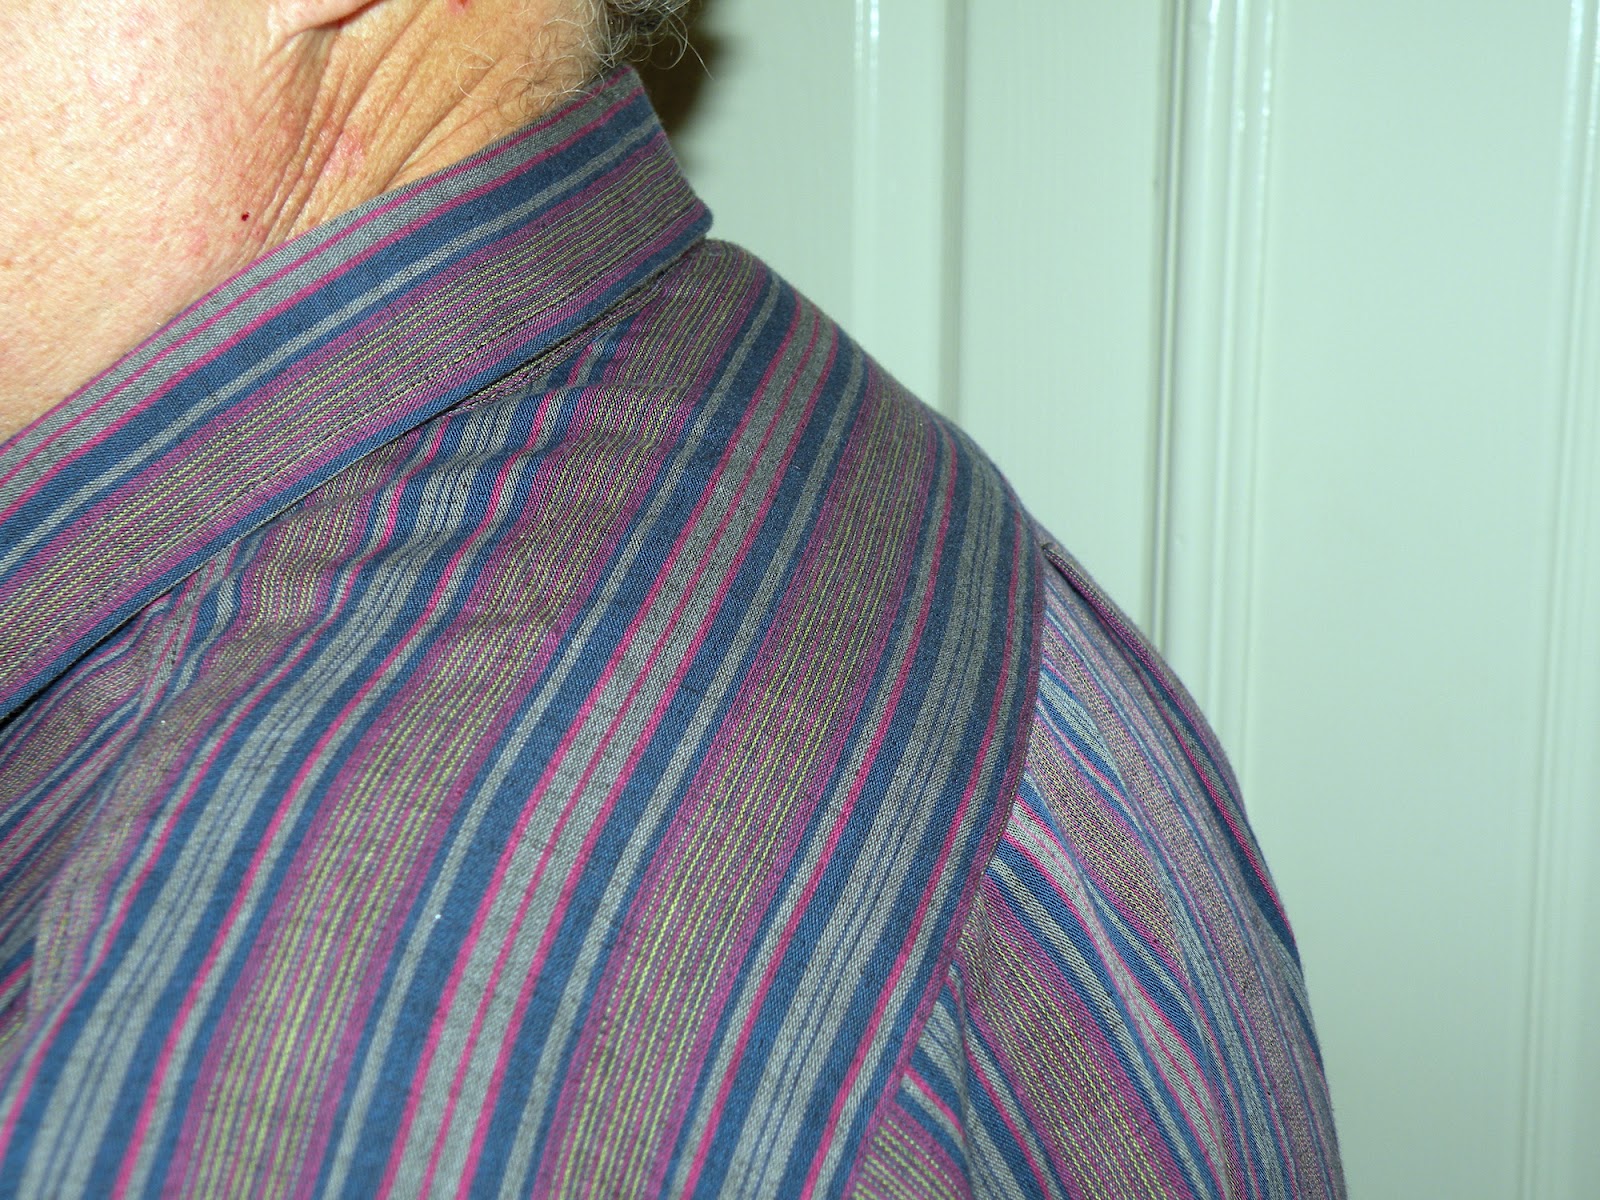
I originally purchased some grey fabric from Gorgeous Fabrics and was going to use some Liberty of London fabric as contrast, but Ann accidentally ran out of the fabric I requested and I had to find something else.  Fortunately, she said I could pick out anything else, up to $14.00/yd to replace the fabric I ordered.  I found the reversible doubleweave cotton fabric pictured below.  I think the color is the most accurate in the first photo.  The second shows the other side.  


The fabric was beautiful, but a pain in the ass to work with because it was so loosely woven, and after cutting, the layers separated from each other.  Very shifty during cutting and sewing.  Also, it was a little thicker than I liked, but my dad sure likes the shirt.  

More pictures:


And the Review:


Pattern Description:

MENĂ¢€™S LINED VEST, SHIRT, TIE IN TWO LENGTHS AND BOW TIE: Vest has front welts, back and back belt are cut of lining fabric; shirt with buttoned front has back pleated to yoke forming forward shoulder seams and cuff variations; lined tie in two lengths and bow tie also included

I made the shirt with the french cuffs.

Pattern Sizing:

(S-L) (XL-XXL), I made the XL for my dad.

Did it look like the photo/drawing on the pattern envelope once you were done sewing with it?

Pretty much, yes.

Were the instructions easy to follow?

I think so.  I didn't use them much.  I've made many shirts like this now for school, so I'm pretty use to the construction.

What did you particularly like or dislike about the pattern?

I thought the sleeves were a little too poufy.  I think I'll try the new men's Vogue pattern next time.

Fabric Used:

A beautiful cotton double weave.  Very loosely woven, and shifty, so it was difficult to work with.

Pattern alterations or any design changes you made:

I made a separate front band on the right side so it could be in a contrast fabric.  I shortened the shirt also.  I also redrafted the under collar so it was slightly smaller and would turn under better.  I hate that the BIG 4 patterns use the same pattern for the under and top collars.  I got a little creative with the contrast fabric.  It was used on the inside back yoke, under collar, inside collar stand, right front band, cuffs and sleeve placket.  I used the David Page Coffin method of making the placket.  I also flat felled the sleeves and french seamed the side seams.

Would you sew it again? Would you recommend it to others?

Yes, but not for a very long time.  Sure, if you like fuller sleeves.  I like slimmer shirts personally.


Next up, a baby outfit.  Finished it in a day and a half, and its already in the mail.  Pictures and review to come.

Friday, April 20, 2012

It's April, and a Very Merry Xmas to you!

School got in the way, so I never posted pictures of what I made as xmas gifts this year.  Here they are:

Vogue 1250!  The "Everyone and their Mother Dress"  Coincidentally, I made it for my mom.  She said she loved it and wants another.


Another Simplicity 2603 Cardi-wrap for my sister.  She requested another one this year:


A dress I drafted from my sister's favorite Michael Star top:


And knit scarves for my sister and my niece.  My sister got the brown and grey infinity scarves and my niece got the zebra/black braided scarf.  Its from a tutorial I found somewhere on the internet, but unfortunately I don't remember where:


And of course the shirt for my dad which I just finished last week.  I've taken pictures and will post it soonish.  

Thursday, April 19, 2012

It's Cursed! Simplicity 3835


I made a cute, quick top.  Totally inspired by Faye's Top-A-Thon, but I did not participate in the actual event.  I would have liked to, but once I get going on a project, I don't stop and start something else until it is done.  So my Dad's xmas present got in the way.


The pattern I used was an old Built By Wendy top, Simplicity 3835.  I made the shirt yeeeaaaars ago, and I think it was the first project I made with my serger.  It was awful, both in fabric and construction.  What I love about the pattern is how much it looks like a RTW Express knit top I bought years ago.  Maybe I'll enter this blouse into the RTW contest, even though it's not that special.


And if you want to know why it's cursed, read the review below:


Pattern Description:
The top is a peasant style with a gathered neckline and short, gathered sleeves. The mini-dress is shown with elbow-length sleeves with a band at the lower edge of the sleeves. The band has extensions which can be tied. There is also a band at the neckline which the top of the dress is stitched to. The regular length dress has pockets, elbow-length sleeves without the band, and a yoke/band at the neckline.

The dresses have back centered zippers and darts. The top is pullover without darts or closure. The top uses the same pieces as the dresses so this means whereas in the dresses darts take up excess room, in the top back there is a slight billowy effect due to the absence of darts.

(Great description taken from RenRen's review)

Pattern Sizing:

4-14, I made the 12 because I wanted it loose!

Did it look like the photo/drawing on the pattern envelope once you were done sewing with it?

I modified the sleeves, so yes and no!

Were the instructions easy to follow?

I did not use them at all this time.  I think they were good the first time a made the top (pre-bloggling and PR).  I just did not like the material I made the top out of the first time so it got chucked.

What did you particularly like or dislike about the pattern?

I love the casualness of the top and the ease of construction.  It only took a couple hrs from cutting to finish, and I'm slow and easily distracted.

Fabric Used:

$1/yd cotton/rayon? lycra print from the swapmeet. Woo, woo!

Pattern alterations or any design changes you made:

I made the 12 because I wanted it loose and breezy.  I also removed teh CB seam as I felt it was unnecessary.  I also did not use elastic on the sleeves.  It looks less peasant-like and more modern IMO. I constructed the entire thing on the serger except the neckline casing and used a twin stretch needle for the hems.

Would you sew it again? Would you recommend it to others?

Yes and yes!

Conclusion:

I love the top, unfortunately it is cursed!  While trimming the hem, I cut a hole in my fabric! And then my dog, who occasionally has bowel issues and leaves little presents on her behind, left me a "little present" on my shirt when I picked her up.  I'm going to re-hem the bottom to hide the hole and of course wash the shirt!

More pics:


Also thanks to my newest follower, KnottedRose, who recently made two cute floral tees!

160 Followers! I need to get a giveaway going soon!

Saturday, April 14, 2012

Vintage Contest: 1969 Skirt


Hi everyone! Just finished a skirt I've been planning to make for a very long time, but never got around to it until the Pattern Review Vintage Contest sparked my interest in sewing for myself again.

Here's the pattern:

Vintage Pattern Wiki


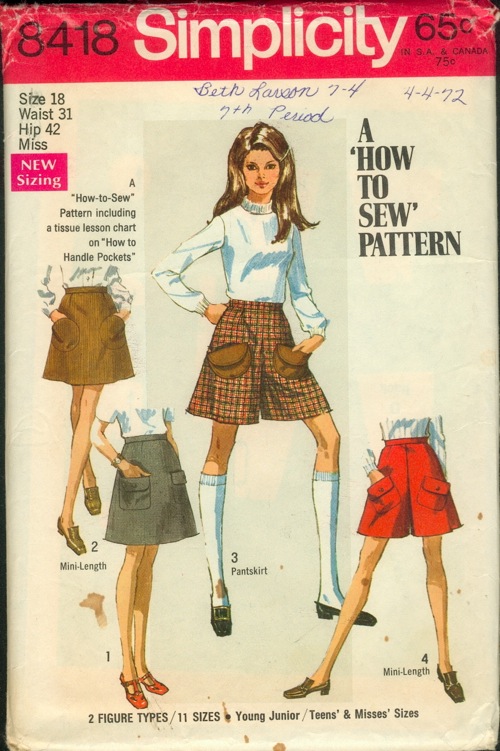
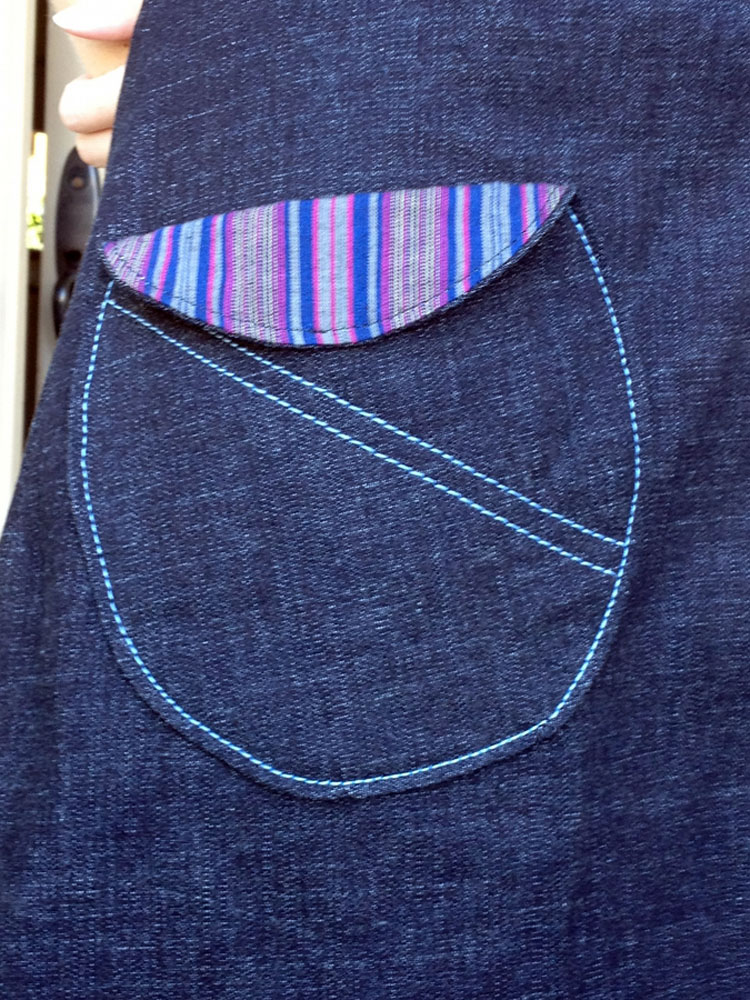
Simplicity 8418; ©1969; Young Junior/Teens' and Misses' Skirt in Two Lengths and Mini-Pantskirt: (Including a Tissue Lesson Chart ... "How To Handle Pockets"). The skirt V. 1 & 2 and the mini-pantskirt V. 3 & 4 with patch pockets have side zipper and waistband. V. 1 is regular length. V. 1 & 4 have shaped pockets with button trimmed flaps. Mini-length V. 2 has round pockets. V. 3 has top-stitched contrasting round pockets with flaps.


Here's the review:


Pattern Description:

Simplicity 8418; Ă‚©1969; Young Junior/Teens' and Misses' Skirt in Two Lengths and Mini-Pantskirt: (Including a Tissue Lesson Chart ... "How To Handle Pockets"). The skirt V. 1 & 2 and the mini-pantskirt V. 3 & 4 with patch pockets have side zipper and waistband. V. 1 is regular length. V. 1 & 4 have shaped pockets with button trimmed flaps. Mini-length V. 2 has round pockets. V. 3 has top-stitched contrasting round pockets with flaps.

I made view 2, the mini skirt.

Pattern Sizing:

Young Jr/Teen
size 13-14
Waist 26
Hips 36.5

Did it look like the photo/drawing on the pattern envelope once you were done sewing with it?

The shape yes! I did some additional topstitching.

Were the instructions easy to follow?

I glanced at them, and they were very good. Sparce, but good.   The extra information on handling pockets was very cute and had some good information!

What did you particularly like or dislike about the pattern?

I think the pattern was a little long. I made the mini skirt and it hits me just above the knee.  Not a true mini, but I'm okay with that.

Fabric Used:

Denim that was supposed to be 100% cotton from Fabric.com.  I swear they sent me the wrong fabric because there was definitely a lot of lycra in there.  I pre-washed the fabric twice and each time it got stretchier and stretchier as the sizing washed out.  Also, when I received it, there was this bad fold line down the center.  Washing it out and pressing did not work so I worked around it.  Ended up topstitching to hide it.

Pattern alterations or any design changes you made:

I added 1" total around the waist, but ended up taking it back in the same about.  I guess with the stretch of the fabric, my 27" waist did not need the extra inch.  Instead of using the half circle shape pocket facing piece, I just cut 1 circle of denim and 1 of the contrast lightweight cotton.  I sewed them RST, clipped and turned.  I really hate sewing on patch pockets that are curved.  Very difficult to get the right shape, so this was easier for me and didn't compromised the look of the design at all. I did a lot of topstitching too!  It was denim and all.  Used a button closure instead of hooks and eyes.   Oh, and a turned down the pockets a little less than in the picture on the pattern envelope.


Would you sew it again? Would you recommend it to others?

I woud not sew it again as I have too many skirt patterns I was to try and draft!  I would recommend it though.


More views of the skirt:


Hope you all like it!  Vote for me :)

Worst Blogger: Follow up to "Bad Blogger"

Sorry everyone! I suck at life, and blogging apparently.  School's over! I'm a graduate...again.  I've been piddling around for almost a month now trying to recuperate and psych myself up enough to sew for myself and look for jobs.  I absolutely hate looking for a new job.  It's quite scary, isn't it?  I'm almost ready to jump in head first!

Thanks to all of you who stuck by the blog even when I was absent.  And all the new followers!  I haven't forgotten you either!

Thanks to:

Denise
Chrissy
Sarah and her singing chihuahua
Andrea670
Julie
Debi from My Happy Sewing Place...Love the Marlene suit!!
RebThack


I'm still reading blogs, but rarely commenting.  So sorry.

I sewed many gifts for xmas, one of which, a long sleeve, button-down shirt for my dad, I just finished.  Hahaha! Thanks FIDM for giving me no time to work on presents for my family until after term.  :-/

So I have xmas presents to blog about, the shirt, and the 1969 skirt I just made and have to post on Pattern Review for the contest.  The skirt will be first.

Pearl misses you guys too!


Pearl really enjoys reading...

Sunday, January 8, 2012

And the worst blogger award goes to...

This girl!


Sorry folks for being MIA.  Last quarter was rough. It wasn't all that difficult.  Actually, I had relatively little work and very little to show.

I've been avoiding blogging because I've been too P.O.'ed about the Red Dress experience and have nothing to show except my sketch and some pictures of the half finished dress.  I was so angry the last day that I didn't even bring a camera to take pictures.  We were told there would be pictures taken of the dress though so I'll have to follow up on that.

I'll talk about my other classes briefly, then the Red Dress class. I only took 3 classes:

The Red Dress Special Project Class

Creative Design Analysis and Collection Development (CDACD)

Computer Pattern I


I enjoyed Computer Pattern making.  We use the Gerber Technology AccuMark pattern making software, and I think it is kind of fun.  The system is a little wonky and not intuitive at all. Nothing like Photoshop of Illustrator. I enjoy it though because to me it's like solving a puzzle.

CDACD was a fun class because we designed 2 bigger collections with little to no restrictions.  My teacher was very nice and informative if you asked the right questions.  I really wish there had been more structured and organized lectures.  The syllabus was not followed at all and I feel we lost a lot of valuable information.

Oh the Red Dress class.....I think I had a hard time this quarter blogging because the only thing I could really show you was my progress on the dress and I was not in love with my design, the fabrics, and most of all, the instructors.  I absolutely regret this class and wish I could get my money back and take Industry Pattern instead.  I can honestly say that I only learned 3 new things this entire quarter and all were explained to me in hindsight...after my dress was done.

1)  DRAPE AND FIT IN A FABRIC SIMILAR TO THE FINAL GARMENT! Yes, I know I've read this before and even fit my own garments this way, but my instructor insisted that draping, patterning, and fitting my bias skirt in muslin would not be a problem.  Only on week 10, the last week of the class, did she mention doing test fits in a similar fabric.  My dress didn't fit the form even though it fit in muslin.  

2) When cutting out bias pieces, hang the bias pieces unassembled overnight in the direction they will hang on the body.  Then place the pattern pieces over the "stretched" pieces and adjust the hem that undoubtedly became distorted.

3)  Sometimes, on a bias garment, the CB needs to be raised a bit to adjust and balance the side seams from swinging backward.

I should have dropped the class in week 4 like I intended, but I was assured the class would get better, and I would learn something.  All the demos were haphazardly planned it seemed, unorganized and usually postponed to following week...and the following week....and the following week until there was not enough time.  There were too many students and not enough working machines and work space was limited.  All the special feet were only available to us when the sewing machine repair man? was available to come in to class and bring them to us.  The first week he came, we hadn't even made our patterns yet.  He didn't come to every class so there was no way of knowing what equipment would be available to us.

I truly believe every student in the class felt the same way I did about the instruction and the way the class was run.  I know some students enjoyed the class because they believed in their design and liked making their dress, regardless of the lack of organization, space and instruction.  I am really glad that some people were able to make the best of the class.  

Okay, and now for some pictures, and what you've all been waiting for:


The first 3 sketches:


I chose sketch #1 because I thought it would be fun to flat pattern.  I ended up draping almost the entire dress...oh, well.  One day I will make sketch # 2.  I love this dress and would love to see it made up in silk velvet.

I first drafted a pattern and made a muslin (but don't have any pictures).  The skirt was way too Sleeping Beauty and the insets were so-so.  My instructors suggested I change the triangle insets to flaps.  I had to redraft the entire skirt portion, change it to princess seams, and I also changed the godets to inserted, inverted pleats.  (Say that 5x fast!)
Here is my second muslin with some fabric pinched out where it needs it:


  And delerious me "piecing" together my 3rd muslin.  I'm so glad I took a quilting class a few years ago because it saved my sanity making this dress:


Muslin # 3 on me.  Unfortunately, the dress was way too big for me:


The final sketch:


And some images of the almost final dress:  


I actually really liked the fabric in the end.  It was a heavy silk charmeuse.  The dress looks awful IMO though....

Back close-up:

I love the beading.  I ended up ripping out these beads and replacing them with darker narrow bugle beads.  They were much better.  I beaded the back collar and the triangle front flaps with scallops and evenly spaced the beads about 1/2" apart along the front of the neckline (not pictured).

Bodice close up:


Maybe one day I'll have better pictures....


Thanks to the followers that were concerned about my absence.  I'll try to keep up the blogging.